 Entry
Entry Dashboard
 Contacts
 Properties
 Email
Email Calendar
 Tasks
Tasks Acquisition Cockpit
 Audit-proof mail archiving
 Automatic brochure dispatch
 Billing
 Groups
 Intranet
 Marketing Box
 Multi Property module
 Multilingual Module
 onOffice sync
 Presentation PDFs
 Process manager
 Project Management
 Property value analyses
 Enquiry Manager
 Showcase TV
 Smart site 2.0
 Statistic Tab
 Statistics toolbox
 Success Cockpit
 Time Tracking
 Address from clipboard
 Text block
 Customer communication
 External Tools
 Favorite links
 Calculating with formulas
 Mass update
 onOffice-MLS
 Portals
 Property import
 Quick Access
 Settings
 Templates
 Step by step
You are here: Home / Modules / Dashboard / Configure dashboard

Dashboard
Configure dashboard
You can customize the dashboard according to your individual wishes and needs. The size and position of the widgets as well as their content can be changed or additional tabs can be added to collect the widgets more clearly.
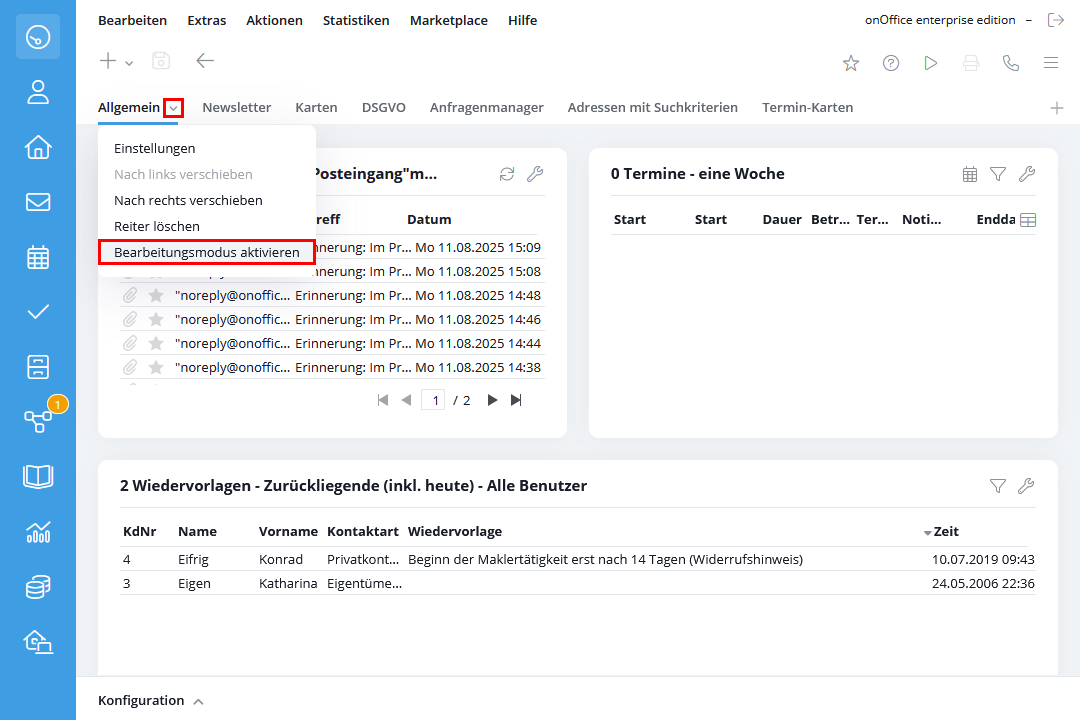
Edit mode
You configure the dashboard and the widgets by activating edit mode. In the active tab, open the “drop-down menu” for editing behind the menu triangle on the right-hand side of the tab and select “Activate edit mode”.
The menu triangle is not displayed in distributed tabs; these have the symbol ![]() on the left in the tab. If there is no menu triangle in other tabs either, you do not have the necessary rights to configure the dashboard. In this case, please contact your administrator. You can still configure the content of the existing widgets.
on the left in the tab. If there is no menu triangle in other tabs either, you do not have the necessary rights to configure the dashboard. In this case, please contact your administrator. You can still configure the content of the existing widgets.
When the edit mode is activated, a wrench symbol ![]() appears on the left side of the current tab.
appears on the left side of the current tab.
You can now add, move and delete widgets as you wish.
Save changes
If you want to save your changes, open the “drop-down menu” for editing behind the menu triangle on the right-hand side of the tab and select “Exit edit mode”.
Click and drag to move widgets from one tab to another. Drag the statistics to the desired tab and wait a moment. After the new tab has opened, you can release the statistics there.
Widget size
The size of the widgets can be changed by dragging at the bottom right of the widget window. To do this, grab the small gray triangle at the bottom right of the widget frame and drag the window to the desired size.

The width can be set to 25%, 50%, 75% or 100% of the width of the dashboard, the height can be set to up to three “lines”.
Add new widgets
Widgets can be added by clicking on the plus symbol at the top left. A window opens with tabs “General”, “Dashboard statistics” and “Other”, from which the widgets can be selected by clicking on “Create widget”.

The new widget is now located at the end of the statistics on the dashboard and can be moved to any position on the dashboard.
You can also add the same widget multiple times, e.g. to display the inbox of different mailboxes or the weather in different locations. The configuration of the widgets is described in the next menu item
Delete widgets
You can remove the widget again using the trash can icon at the top right of the widget frame.
Save changes
If you want to save your changes, open the “drop-down menu” for editing behind the menu triangle on the right-hand side of the tab and select “Exit edit mode”.
Tabs in the dashboard
You can change the individual tabs as long as you have the necessary user rights and it is not a distributed tab (symbol ![]() ).
).
In the active tab, you can open the “drop-down menu” for editing behind the menu triangle on the right-hand side of the tab.
Add Tabs
The dashboard only has the “General” tab by default, but new tabs can also be created. To do this, click on the plus symbol on the right in the table bar. The create dialog opens. Here you specify the name (and the mode for the statistics tab in the dashboard).
If there is no plus symbol , you do not have the necessary rights to configure the dashboard. In this case, please contact your administrator.
Change / Delete Tabs
In the active tab, you can open the “drop-down menu” for editing behind the menu triangle on the right-hand side of the tab.
Click on “Settings” to open the configuration as when creating the tab. Here you can change the name of the tab.
In the menu you can now move the tab to the right or left. Please note, distributed tabs are always in the first position on the left.
You can also delete a tab here.
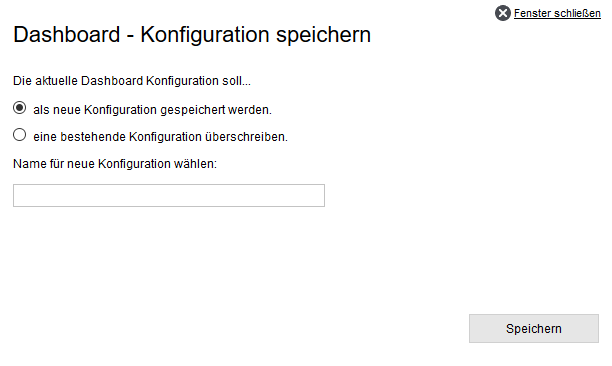
With this option, the current dashboard tab can be saved as a template for other users. When saving, all list settings (columns and sorting) of the individual widgets are also saved. This means that the user to whom the dashboard is distributed or who creates it themselves via “Open” receives the configuration as you have saved it.
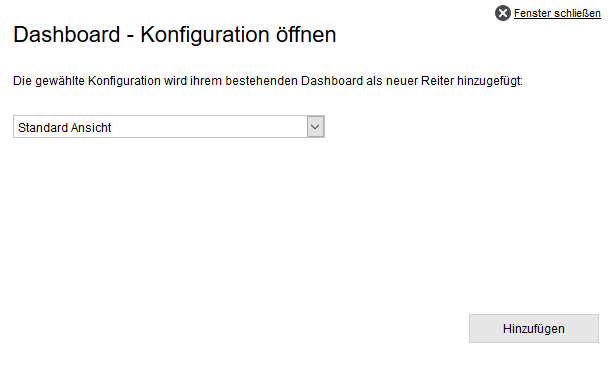
A selection of previously saved dashboard tabs can be opened. Click “Add” to add the selected tab to the existing tabs. Accordingly, you do not need to create an empty tab beforehand.
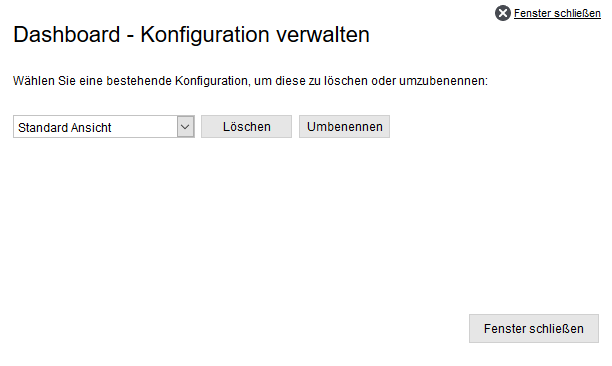
You can use this option to rename or delete the configurations that have already been created.
The saved tabs can be distributed by the administrator via the user administration . Please note that only one tab can be specified per user, this is displayed as the first tab and the icon ![]() : The tab cannot be edited by the user.
: The tab cannot be edited by the user.


