You are here: Home / Additional modules / Time recording / Use working time recording

Time recording

Use working time recording

Working time recording start/stop

On each page of the software, the “working time recording box” is built in at the top right.

Notice:

Please note, the working time recording happens independently from the logon or logoff in onOffice enterprise edition. Working time recording must be started/stopped consciously and actively.

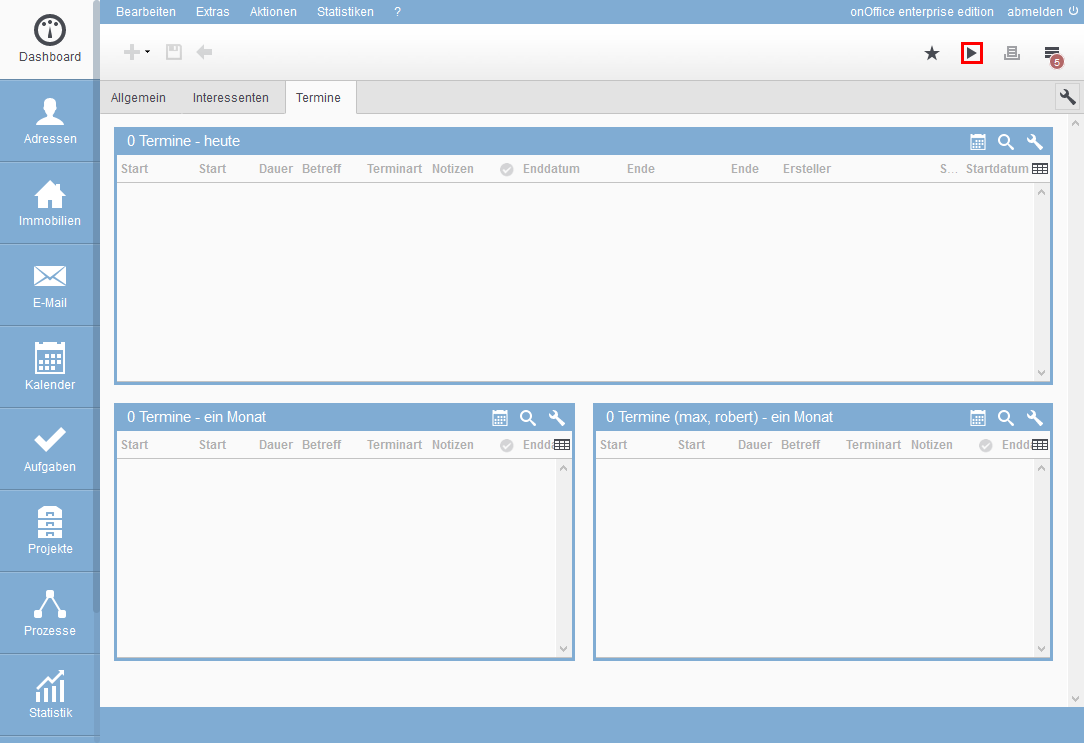
The working time is started via the symbolStart. During a break or at the end of work, the working time can be paused in any browser tab by clicking the Breakicon.

If you misclicked or forgot to record the working time, you can correct it on the working time overview.
Today’s recorded working hours or break hours are also displayed as a tip if you position the mouse over the working time recording box for a moment.

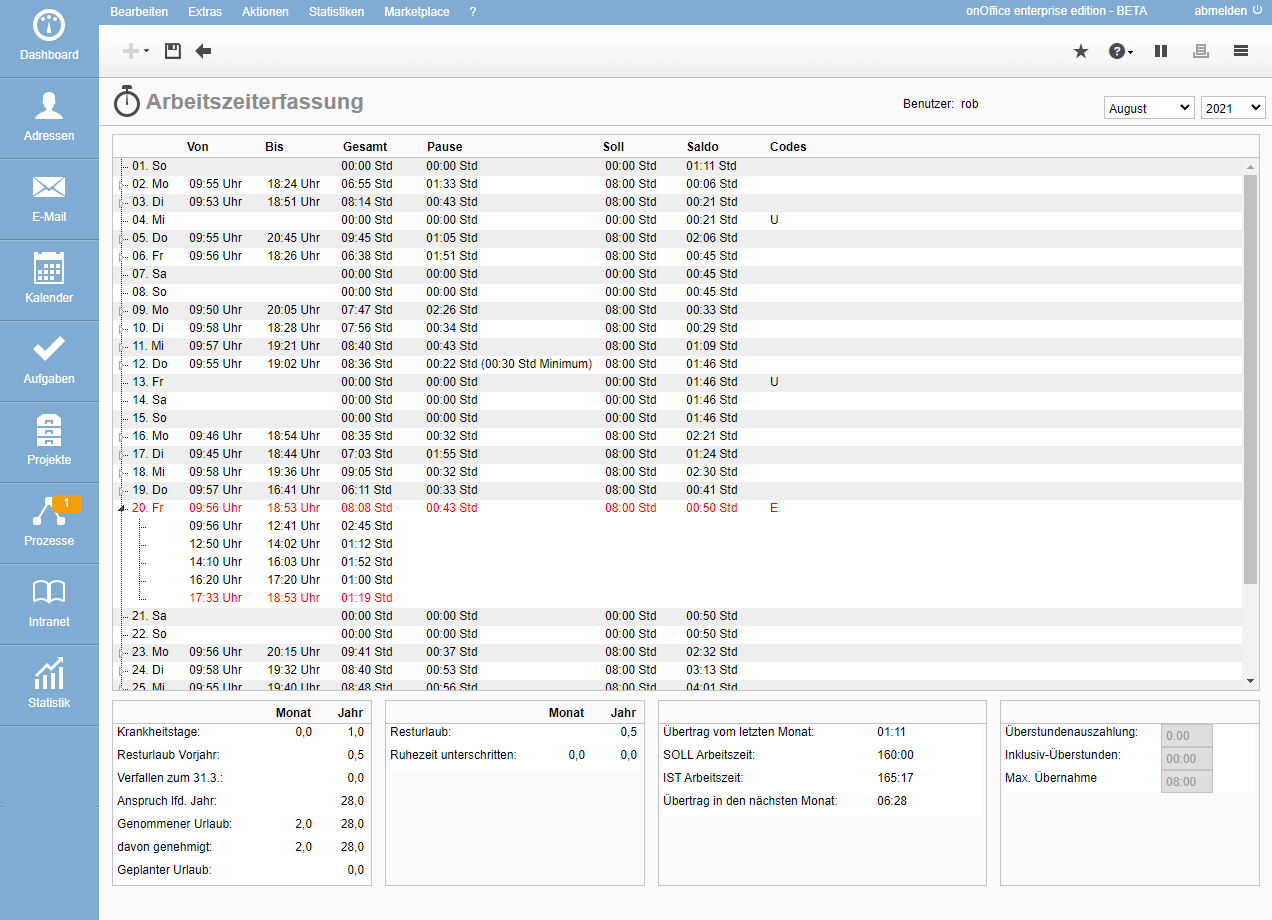
Working time overview

How many hours did I work? How many should I work? Which days have been recorded as vacation? What other vacation days can I plan?

All these data can be found in the overview of the working time recording: Edit >> Working time recording. When opened, the current month up to the present day is always displayed. The working hours of past months/years can be displayed via the selection at the top right.

With the corresponding user right , you can also view the working time recording for other users. This also includes the working hours of permanently deactivated users.

The presentation is divided into the following sections.

  • List of days with the recorded hours
    Here you can find a summary table with the days and the recorded hours. On days with recorded working hours, a small triangle appears in front of the day, allowing you to view the day’s data in detail. So you can see exactly when the time was started or stopped.
    The Codes column on the right shows whether it is a vacation, public holiday, etc. Subsequently changed working times or days are displayed in red letters.
  • Vacation days/ sickdays
    The vacation days/sick days of the selected year are displayed here.
  • Remaining leave / rest time
    The remaining leave is displayed here, as well as how often the set rest time has been undercut. The remaining leave displayed is the number of days of leave still available and not scheduled. The rest time can be set in the settings for the working time recording. Note that a value for “Remaining leave valid until” must be set in the settings so that the remaining leave can be transferred.
  • Hourly balance
    Balance of actual/target/overtime and carryover for the month shown. In the case of inclusive overtime, the “plus balance” does not change until target time plus inclusive overtime is exceeded.
  • Overtime payment
    If overtime payment is agreed and the user is allowed to adjust its number, the corresponding number of hours can be entered here.
  • User and month selection
    The month and year for which the data is to be displayed can be selected here.
    Employees who are to manage working hours can also select the users for whom working hours are to be displayed here. To do this, the employee must be given the appropriate user right.

The individual months can also be printed out together with details via the “Print” button.

Changing the working time

If you make a mistake when recording the working time, you can correct it yourself, how many days retroactively is determined by the boss. In the overview of the working time recording, you can change the working time for all days that have a plus symbol on the far right.
  • Enter additional block of working time: The plus symbol inserts a line in the day details, for which you then enter the start and end time of the work block.
  • Change existing times: If there are already different work blocks in the day details, you can simply click in the time entry and then enter the new value.
Each change is saved via the disk symbol and a reason is requested, which is also stored in the database. The reason is then displayed in the mouseover of this day. After a change, the working time block that was changed and the day are displayed in red letters. In addition, an “E” is displayed in the “Codes” column. Employees who are to manage the working times can change all days retroactively and also change the target time for individual days. This change will then also result in a red font. To do this, the employee must be given the appropriate user right.

Request vacation

Vacation days are accounted for in the working time recording. The data for this is taken from the appointment management.

For this purpose, vacation is entered into the calendar as an appointment, approval is requested and then charged.

Request

A date is entered in the calendar for a leave request, which requires the following information:

  • Basic data
    • Appointment type: Vacation
    • Date: first day of vacation
    • Start/End: Check off full day appointment or enter times for half day.
  • Options
    • Repetition: Daily
    • Repeat Start/End: Beginning and end of the vacation. Weekends/holidays are not counted as vacation days.

For the vacation appointments, the appointment popup will then show if the appointment is not requested/applied for. You send the request via the actions bar in the appointment popup. To do this, please select Further actions >> Request approval. The request will be sent to the group leader, or to the e-mail contact stored in the basic settings, and you will receive an e-mail about the result.

Once the appointment has been requested, the appointment time slots CANNOT be changed. If necessary, the appointment must be deleted by the group leader and a new application must be submitted.

Indeed, after sending the approval request and the appointment approval, “special rights” for editing and deleting apply. This allows the appointment to be edited or deleted only by group leaders.

Approval

Heads of an office group, the deviating contact in the group basic data or the e-mail contact stored in the basic settings will receive the vacation requests with the corresponding appointment data by e-mail. In the e-mail, the leave can be approved or rejected directly via a link. The user who requested the vacation will be informed about approval or cancellation by e-mail.

Sick note

An appointment is also created for sick messages with the appointment type “Sick”. The corresponding time periods are then entered in the working time recording.

Holidays

The holidays displayed depend on the user’s state in the user data under Tools >> Settings >> User >> Basic data >> Imprint.

Shutdown

If an authorized user has entered a shutdown that also applies to the current user, it will be displayed with a target working time of 00:00 hrs and the code “BR”.

Rest periods

The minimum rest time can be set in the working time recording settings .

Via this field you have the possibility to configure national or EU-wide regulations for the Working Time Directive. If a value greater than 00:00 is entered, the user will receive a message at the start of the working time if he has fallen below the entered rest time within the last 24 hours. If he starts the working time nevertheless, the person who is also deposited for other appointment approvals is informed about it by e-mail. In the working time recording, this is represented with the code RZ as “Rest time fallen short of”.

Mobile working time

If the working time was started in the onOffice app, this is displayed with the code “M” for “mobile time recording”.

Tasks

With the working time recording you can also record how much time has gone into individual tasks. For this purpose there is a button “Start Timetracking” or “Stop Timetracking” in the Actions Panel of the tasks.

Tasks in the sidebar

In addition, the “Tasks” section appears in the sidebar , where you can see who is currently working on which ticket.

You can define there via the settings which users are displayed.

There is no explicit task for standard tasks such as e-mail processing, but you can choose one of the standard tasks in the dropdown.

These standard tasks must have been previously created per user and via da erfassen, you can create a task and mark it as a standard task via the Favorite checkbox.
After that, you can, for example, defer the task until the end of the quarter or year. After that, a new task is created for the next evaluation period, which is then tracked.

In order for tracking to be used optimally, there is the tracking indicator.