
 Entry
Entry Dashboard
 Contacts
 Properties
 Email
Email Calendar
 Tasks
Tasks Acquisition Cockpit
 Audit-proof mail archiving
 Automatic brochure dispatch
 Billing
 Groups
 Intranet
 Marketing Box
 Marketplace
 Multi Property module
 Multilingual Module
 onOffice sync
 Presentation PDFs
 Process manager
 Project Management
 Property tracking
 Property value analyses
 Enquiry Manager
 Showcase TV
 Smart site 2.0
 Statistic Tab
 Statistics toolbox
 Success Cockpit
 Time Tracking
 Address from clipboard
 Text block
 Customer communication
 External Tools
 Favorite links
 Calculating with formulas
 Mass update
 onOffice-MLS
 Portals
 Property import
 Quick Access
 Settings
 Templates
 Step by step


You are here: Home / Additional modules / Marketplace / Provider overview / onOffice Services - Newsletter Connector

Marketplace
onOffice Services – Newsletter Connector
Synchronization with Brevo only works with German or English Brevo user accounts. The assignment of the fields (first name, surname etc.) only works if the Brevo fields are available in these languages.
Inhaltsverzeichnis
Description
Connect your email marketing tool to onOffice enterprise—with our Newsletter Connector. The interface ensures seamless data exchange between Mailchimp or Brevo (formerly Sendinblue) and your onOffice Enterprise version. Time-consuming exports and imports, or incorrect entries? Those days are long gone!
✅ automatic synchronization
All relevant contacts are automatically synced, including their email addresses, subscription status, and important tags. This ensures that your data is always up to date in both systems—without any extra clicks!
✅ Complete Overview of Activities
Every email you send using your external tool is seamlessly recorded by onOffice enterprise as an activity in the corresponding record. You can always see exactly when each contact received which newsletter.
✅ Time savings and efficient data management
With the onOffice Newsletter Connector, you can reduce your manual effort while keeping your database up to date. No duplicate entries, no tedious exporting and importing of contact lists—data maintenance happens all on its own.
Effective newsletter marketing has never been easier.
Activation
Activate our Newsletter Connector in the Marketplace now and always stay on top of your email activities!
Instruction
The following instructions cover how to set up the onOffice Newsletter Connector. For information and help on configuring and sending newsletters in Mailchimp or Brevo (formerly Sendinblue), please visit the respective providers’ websites.
If errors occur during the synchronization of all or individual contacts, please check the server status pages of the providers first.
Mailchimp: https://status.mailchimp.com/
Brevo: https://status.brevo.com/
onOffice: https://onOffice.com/status-news/
Set Up the Interface
To connect onOffice enterprise to your desired service using the Newsletter Connector, follow these steps:
- First, create an account with Mailchimp / Brevo, if you don’t already have one.
Important notes:- The target audience in Mailchimp / list in Brevo is automatically created when the integration is enabled. It is absolutely essential that it be named “onoffice” (not onOffice!) to ensure a smooth data transfer.
- The free Mailchimp account includes only one audience. To ensure that you can create a target group when setting up the Newsletter Connector, please check beforehand whether one is available in your account.
- The Newsletter Connector can only process field labels in German and English (first name, last name, etc.).
- If you already have a user account, please check before syncing whether you want to export your recipient groups as a backup. During synchronization, existing contacts are updated and tags are transferred to onOffice.
- Enable the Newsletter Connector in the onOffice Marketplace.
- Open the Newsletter Connector from the menu bar in onOffice enterprise under Marketplace >> Newsletter Connector >> Address Synchronization .
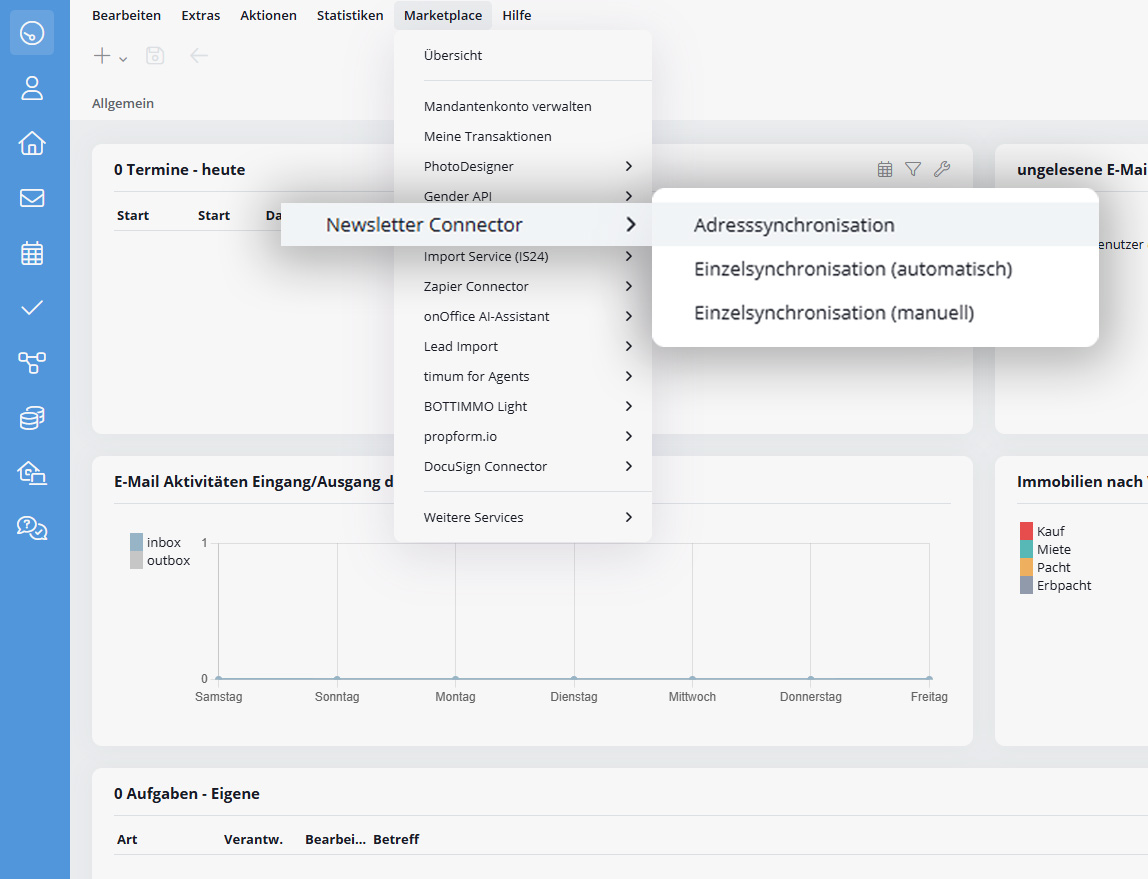
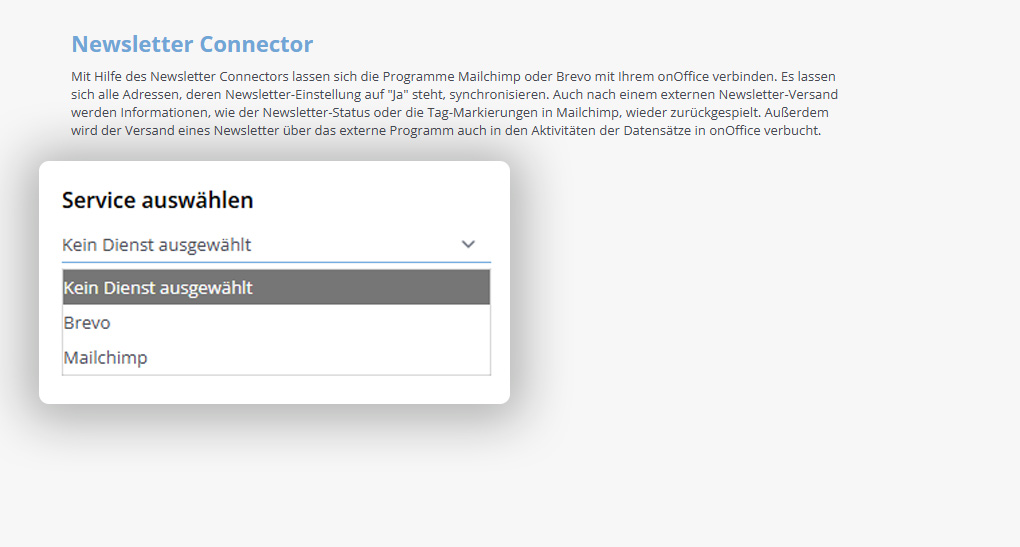
- A pop-up window opens. Select the service you want (Mailchimp or Brevo).
- In the “API Key” field, enter the API key from your user account. For detailed instructions, click the link below the input field. In short: In Mailchimp, you can find the API key in your account under Tools >> API Key , and in Brevo, you can find it in your account under “SMTP & API” . Follow your provider’s instructions for generating the API key.
- Use the checkboxes to select the actions for which you want to create an activity in your records. “Log In” and “Log Out” are preselected and cannot be deselected. In addition, Mailchimp offers the options “Delivered” and “Hard Bounce.”

- With Brevo, you also have the choice between “Delivered,” “Opened,” “Click,” and “Hard Bounce.”
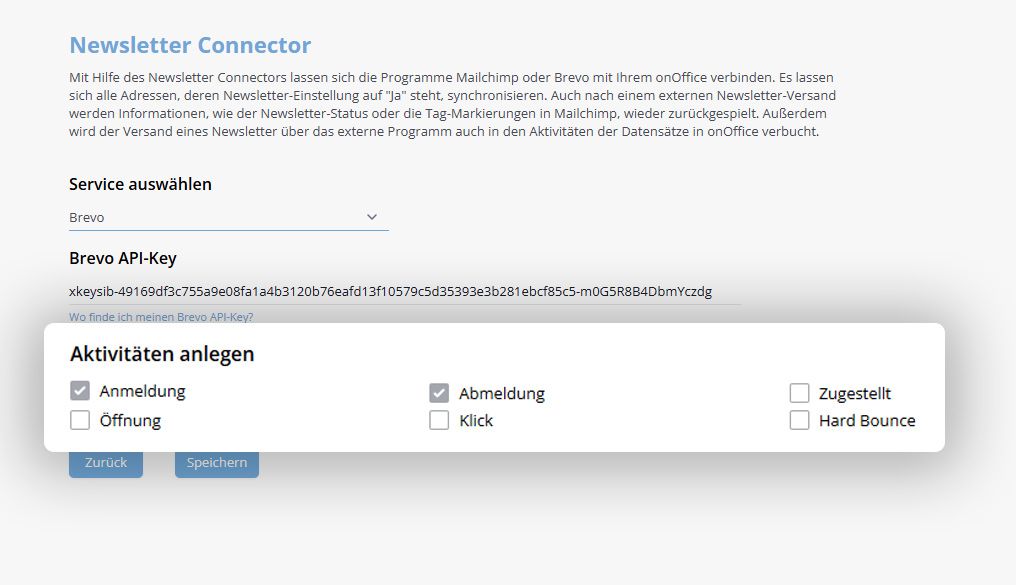
- Click “Save,” and the connection between onOffice enterprise and your newsletter tool will be established.
Synchronize contacts for the first time
To set up the Newsletter Connector, you’ll need to manually sync your contacts once. Start the service by selecting Marketplace >> Newsletter Connector >> Address Synchronizationfrom the menu bar. The pop-up window you’re already familiar with will open. Click the “Start Synchronization” button.
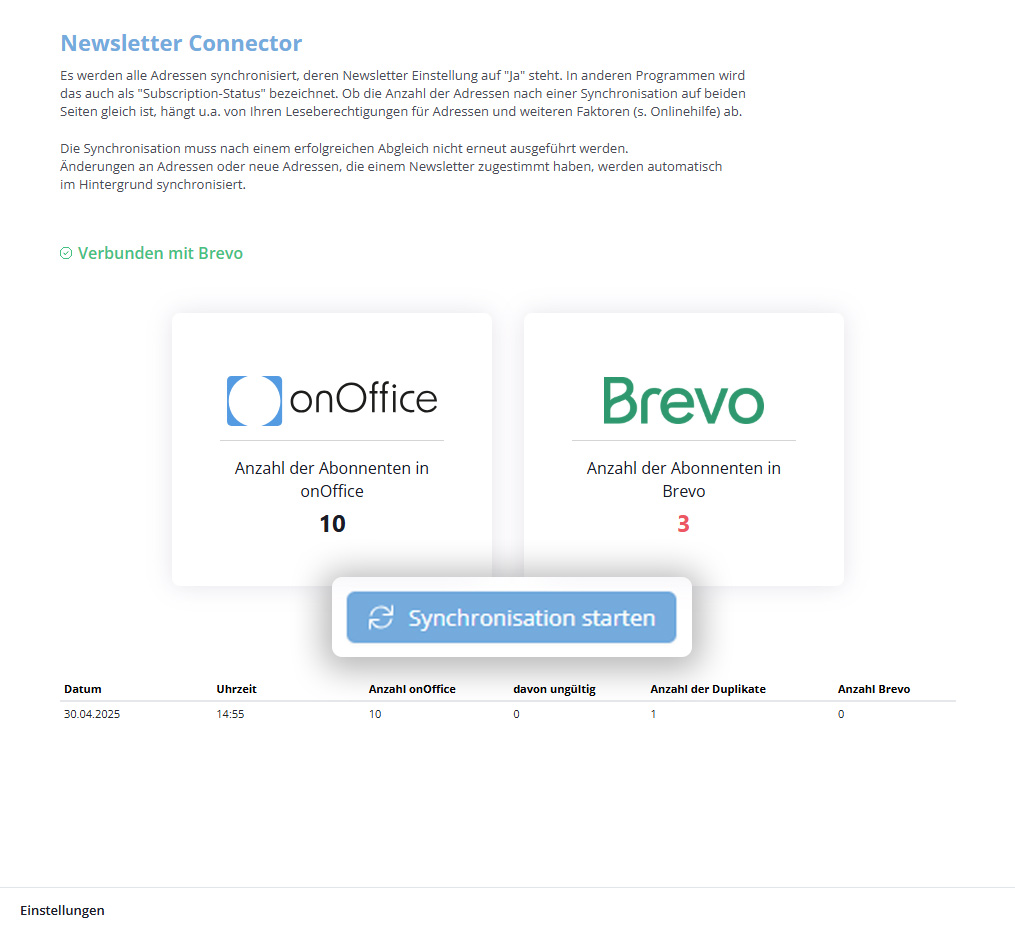
The system will now synchronize all contacts whose newsletter setting is set to “Yes.” Once you have completed this process, new contacts or changes to the existing contacts fields—”Title,” “First Name,” “Last Name,” “Email,” “Newsletter,” and “Newsletter Tags” (Mailchimp only)—will be automatically synchronized in the background.
Important notice
Brevo cannot process change notifications (logins and logouts) during synchronization. So be sure to perform the synchronization at a time when you do not expect any changes. After synchronization, also check which contacts in Brevo were updated during that time period.
Synchronization may take some time, depending on the number of contacts. The display in the pop-up is not updated automatically. Please wait a few minutes before refreshing or reopening the pop-up.
Both Mailchimp and Brevo use a queuing system. In Mailchimp, you can watch as the number of contacts steadily increases during synchronization until the process is complete. With Brevo, however, it can take up to 30 minutes for all contacts to appear in your list. Therefore, be sure to check the notifications in your user account for both providers.
Even after a complete synchronization, the number of subscribers displayed in the pop-up window may vary slightly between onOffice enterprise and your newsletter tool. Possible causes for this include:
- Your newsletter provider is rejecting contacts. In Mailchimp, this may occur with contacts that were previously deleted rather than archived (for more information, see Mailchimp’s sections on cleaned-up contacts and deleted contacts).
- There is Missing read permission for certain contacts in onOffice enterprise.
- In onOffice enterprise, there are duplicate email addresses—that is, multiple entries with the same email address. In the newsletter tool, each email address appears only once.
- Some records contain invalid email addresses. Synchronization is not possible for contacts with an invalid or missing email address.
More Information
After the API key is saved, Mailchimp and Brevo create a webhook that controls the transmission of changes to onOffice enterprise. In principle, it is possible to customize this, but we strongly advise against it.
The reason: If you configure the webhook incorrectly, newsletter unsubscriptions may not be transferred to onOffice enterprise. After another full synchronization, an unsubscribed subscriber would receive a newsletter again in the next campaign. Under the GDPR, this constitutes a violation of the law.
Webhooks in Mailchimp
In Mailchimp, you can find your webhooks under Audience >> More Options >> Audience Settings >> Webhooks “Manage Webhooks” >> “Edit” button. A lightbox containing all the settings will open.
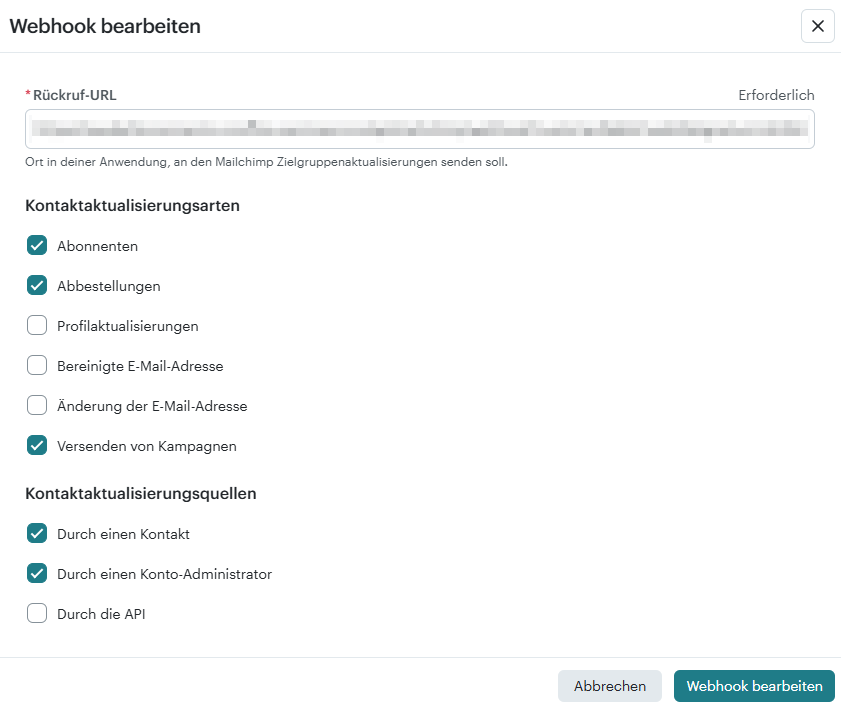
Select the actions for which data should be transferred to onOffice enterprise. Options include “Subscribers”, “Unsubscribes”, “Profile updates”, “Clean email address”, “Change email address” and “Send campaigns”. Here’s how to enable or disable the creation of an activity in the record for each action.
Important:
- If you change the webhook URL, the service may stop working.
- Never enable the “Via API” option, as this will trigger a resync of all contacts during synchronization.
Webhooks in Brevo
In Brevo, you can find these settings under Settings >> Contacts >> WebHook >> “Actions” button >> “Edit”. A lightbox will open where you can configure the various settings.

Here, too, you can choose which actions should trigger a transfer to onOffice enterprise. The options are “Marked as Spam,” “Opened,” “Clicked,” “Hard Bounce,” “Unsubscribed,” “Soft Bounce,” and “Delivered.” When updating a contact, you can choose between “Added to a list,” “Updated,” and “Deleted.”
Important:
- If you change the webhook URL, the service may stop working.
Special Field “Salutation”
Mailchimp automatically generates salutations such as “Dear Mr.” and “Dear Ms.” This requires that the “Salutation” field be enabled in the Mailchimp contact table.
What is transferred?
Full update via the Newsletter Connector window
- For the Newsletter Connector, onOffice enterprise is always the master system.
- When you perform a full synchronization, all addresses whose “Newsletter” field contains the value “Yes” will be transferred to your newsletter service.
- If you assign tags to your contacts in Mailchimp after a full synchronization, those tags will be transferred to onOffice enterprise during the next full synchronization. Exception: The “onoffice” tag is not taken into account in this process. Tags are transferred from Mailchimp to onOffice enterprise only during a full sync. Individual changes are not transmitted immediately.
- In Brevo, you can only specify one day, which must be “onoffice” when using the Newsletter Connector.
Transfer individual changes from onOffice enterprise to your newsletter service
- Conditions for automatic transfer: The automatic transmission of individual contact changes to the provider is triggered exclusively by the following actions:
- When a relevant value (e.g., in the “Newsletter” field or in the newsletter tags) is manually changed directly in the contact. The system generally takes into account all changes made to the “Title,” “First Name,” “Last Name,” “Email Address,” “Newsletter,” and “Newsletter Tag” fields (Mailchimp only).
- When the value in the “Newsletter” field is set or changed using the Agreementlink function “Set Value” .
- Exceptions (No Transfer): When data is modified through automated or bulk processes, no automatic transfer takes place. Changes to the fields are ignored in the following cases:
- during Contact Import
- during a mass update
- for changes made via the API
- If you change the values (Yes / No) in the “Newsletter” field, this will result in a subscribe / unsubscribe in Mailchimp or a subscription / blacklisting in Brevo.
- You can manage newsletter tags through onOffice enterprise and transfer them to Mailchimp immediately. Enable or disable this feature. Please do not rename tags in the onOffice administration, as this leads to duplicates!
- Important: If you use the “Private” contact field and enable it for a contact, that contact cannot be synchronized.
Transfer individual changes from your newsletter service to onOffice enterprise
- In general, the connector forwards all newsletter subscriptions and unsubscriptions to onOffice enterprise. Regardless of whether these changes are made by a Mailchimp or Brevo administrator or by the subscriber themselves.
- When you delete or archive a contact in Mailchimp or Brevo, the system sets the newsletter status in onOffice enterprise to “not specified.”
- The Newsletter Connector ignores the “Archive All” feature in Mailchimp.
- The system does not send individual changes to tags in Mailchimp to onOffice enterprise. This happens exclusively during a full adjustment.
- As soon as a new contact is created in Mailchimp or Brevo, it is synced with onOffice enterprise. This also applies to the registration of a website visitor, provided that you configure the corresponding setting in your newsletter tool. You can control or prevent this by deciding whether or not to create the new contact in the “onoffice” target group.
Documenting Activities in onOffice Enterprise
- When a user logs in or out, the system automatically creates an activity in the corresponding record.
- In the Newsletter Connector settings in onOffice enterprise, specify whether activities should also be created for other newsletter campaigns. The following are possible:
- Mailchimp:
- “Delivered” – Email activity for each recipient who receives the newsletter
- “Hard Bounce” – An email cannot be delivered due to a hard bounce
- Brevo:
- “Delivered” – Email activity for each recipient who receives the newsletter
- “Open” – The recipient opens the newsletter
- “Click” – The recipient clicks on a link in the newsletter
- “Hard Bounce” – The email cannot be delivered due to a hard bounce
- Mailchimp:
Important
The Newsletter Connector does not support groups. This means that you can only enter one Mailchimp or Brevo API key per onOffice Enterprise customer version in the Newsletter Connector settings. As a result, onOffice enterprise may also count subscribers for whom you, as a user, may not have read access.
- Value added tax on marketplace purchases
- Assign debits via reference ID
- Provider overview
- Casafari - AI meta property search
- onpreo - Property acquisition
- Wordliner - Acquisition marketing software
- onOffice Services - DocuSign Connector - digital signatures
- onOffice Services - WKO Marketplace - Portal for joint business in Austria (MLS)
- onOffice Services - Zapier - Data exchange and automation
- PriceHubble Deutschland GmbH - Interactive property value analysis
- propform.io - Webforms
- PropNow - Digital quotation process
- PROPUP - Digital form & workflow management
- Residenture - Online auction platform
- onOffice Services - Gender API
- Sprengnetter property Valuation
- Sprengnetter - Real estate valuation in Europe
- timum - sightseeing organizer
- Total Render - Floor Plans Italy
- ViertelCheck - Information on the micro and macro situation
- finioo - Application folder
- Justhome - Real estate financing
- BOTTIMMO - Marketing software and digital acquisition
- ESYSYNC - Display systems
- FPRE - property analysis and valuation
- Geolyzer - infrastructure data
- immo-billie - Digital bidding process
- Immogrundriss - Floor plans & visualizations
- AreaButler - Interactive maps and AI assistant
- Kerberos compliance management systems
- KIM real estate valuation
- Lead Import
- Tenant check - credit check of prospective tenants
- MYVIVENDA - Print on Demand
- onOffice Services - PhotoDesigner
- onOffice Services - AI-Writer - AI for property texts
- Service not usable?
- Use service
- Unlock/lock provider
- Manage account
- Create account