 Entry
Entry Dashboard
 Contacts
 Properties
 Email
Email Calendar
 Tasks
Tasks Acquisition Cockpit
 Audit-proof mail archiving
 Automatic brochure dispatch
 Billing
 Groups
 Intranet
 Marketing Box
 Multi Property module
 Multilingual Module
 onOffice sync
 Presentation PDFs
 Process manager
 Project Management
 Property value analyses
 Enquiry Manager
 Showcase TV
 Smart site 2.0
 Statistic Tab
 Statistics toolbox
 Success Cockpit
 Time Tracking
 Address from clipboard
 Text block
 Customer communication
 External Tools
 Favorite links
 Calculating with formulas
 Mass update
 onOffice-MLS
 Portals
 Property import
 Quick Access
 Settings
 Templates
 Step by step
You are here: Home / Entry / Structure of the surface / Menu bar content / Extras

Entry
Extras

With onOffice enterprise edition you can export all available data like tasks, projects, appointments, properties or contacts as *.csv file.
To do this, go to .

First select the type of data you want to export. After that you can tick the fields you want to export. All active fields are available for selection, the Status field for contacts and properties even if it is not active. If fields with the same name are checked, the field name is displayed in the header line in addition to the field content.
In addition, the search criteria and the addresses from the relationships can be exported for addresses.
The fields for the search criteria are not in the standard export. The fields in the corresponding category “Search criteria – Standard fields only” must be selected.
If addresses are exported from relationships, the “Export addresses from relationships with” option must be checked at the bottom of the profile selection. If this option is activated, all addresses linked via the “Relationships” tab are also included in the CSV export in addition to the main addresses.
For property, linked contact data of contact person, owner, tenant and buyer of the property can also be exported.
You can split fields with multiple entries (e.g. phone number), then a column will be created in the export file for each entry in this field.
You can select all fields or deselect all fields using the selector next to the “Selected profile” entry.
In “Field names” you can set whether the column names in the export file should be the field names from the database or the field contents / labels.
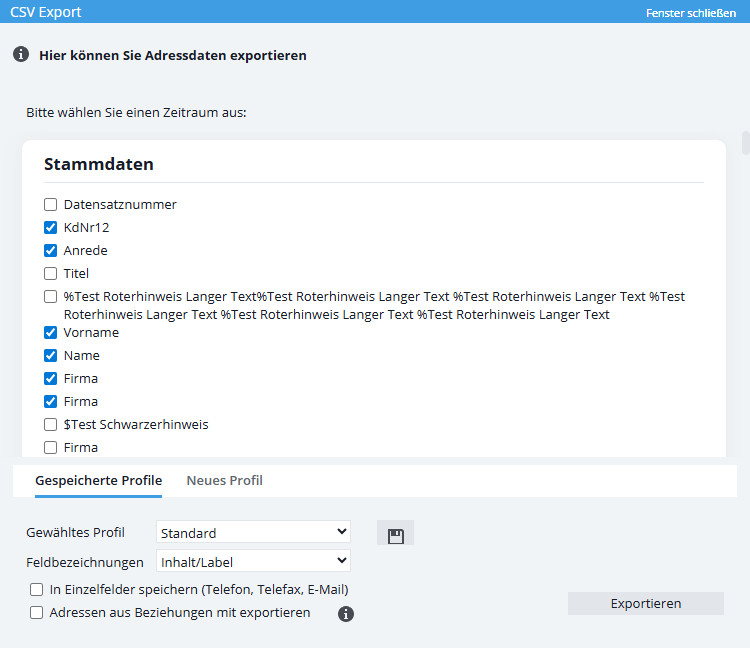
If the assignment for all desired fields is set, the export can be started with “Export Execute”.
Now you can open the generated file for example with Excel, import it into Outlook etc.
Inhaltsverzeichnis
Export profiles
Using this function, you can create predefined export profiles. Select all the desired fields once and save them in a profile (New Profile tab). The next time you need these export settings, select the stored profile and the predefined field settings will be loaded automatically without having to select them again.
Data import from CSV
With onOffice enterprise edition you can import both your external contact data and your external property data in *.csv format.
First of all, the data to be imported must be prepared. When exporting e.g. from Outlook, there are many unneeded columns in the CSV file. Columns such as Street Business2 and Street Business3 can normally be deleted. But if you want to import the content, you have to create the corresponding fields in onOffice beforehand.
To start a CSV import, click on and select the desired import function here.
1. CSV contact import
Select your corresponding CSV file via the “Browse” button on your computer and upload it to onOffice enterprise edition via the “Upload” button. After successful upload, the fields known from the CSV file are automatically displayed under the heading “CSV field name”. As soon as matching enterprise fields are available, they are automatically assigned to the matching CSV field name. Unknown fields are initially marked as “do not import” by default, but can be manually assigned to a specific field.
Please ensure that you select the correct category, as this will change the values under Fields.

Various options are available to you for the duplicate check. Select the desired check and mark the fields to be checked by placing the check mark. Please note here that records that match the duplicate criteria from the CSV file will not be recreated in enterprise.
Once you have made all the settings, you can start the CSV import by clicking the “Import” button.
2. CSV property import
The property import works in the same way as the CSV contact import. For further explanations, see above.
3. CSV agent’s log entry import
Import of agent’s log entries is possible, but the assignment of the fields must be done carefully. Wenn Sie sich nicht sicher sind kontaktieren Sie bitte den onOffice Support (+49 241 44 686 122 / support@onoffice.com).
With the help of the option “Data import from portal” you can e.g. transfer properties from Immobilienscout automatically into your onOffice enterprise edition.
You can find more information about this function here.
In general, the record information can only be called up by users with the“Call up record information”right. Via the “Extras” menu, the item is only available in the detailed view of a property or a contact record.
When you call up the record information via the menu, the basic information is displayed first – created on, created by etc..
In the extended information, all changes to the data are reflected. Here you can select a period (max. 360 days) from which the changes to the record should be displayed. In the case of multilingual properties, you can also choose between the individual language data records, as different changes may have been made to these.
This opens the job overview of the portal transfers. It gives a quick overview of portal transfers and their status.
There is a possibility in onOffice to import property data from another software or also from other onOffice versions. This property data must be sent in OpenImmo format to the import interface of your onOffice version. Detailed information can be found at OpenImmo-Import.
This item is available only if they use the simple rights system .
Mit dem Immobilienaustausch können Sie Immobilien mit anderen onOffice-Nutzern austauschen. Details finden Sie hier.
Here you will find the list of favoritesyou have deposited.
The default settings of your software are made so that you can work directly with onOffice enterprise. In addition, you have the possibility to make various fine adjustments in your onOffice application. The integrated user administration allows you to create users including the assignment of individual rights. You can change the fields of the input masks and menus etc. via the administration.
The “Notifications” setting can be used to control how the settings are set in the browser. Notification settings that have already been made can only be changed in the settings of your browser.
Detailed descriptions of the majority of the functions under the Settings menu item can be found here.


