Entry
Entry Dashboard
 Contacts
 Properties
 Email
Email Calendar
 Tasks
Tasks Acquisition Cockpit
 Audit-proof mail archiving
 Automatic brochure dispatch
 Billing
 Groups
 Intranet
 Marketing Box
 Multi Property module
 Multilingual Module
 onOffice sync
 Presentation PDFs
 Process manager
 Project Management
 Property value analyses
 Enquiry Manager
 Showcase TV
 Smart site 2.0
 Statistic Tab
 Statistics toolbox
 Success Cockpit
 Time Tracking
 Address from clipboard
 Text block
 Customer communication
 External Tools
 Favorite links
 Calculating with formulas
 Mass update
 onOffice-MLS
 Portals
 Property import
 Quick Access
 Settings
 Templates
 Step by step
You are here: Home / Additional modules / Groups / Office Group

Groups
Office Group
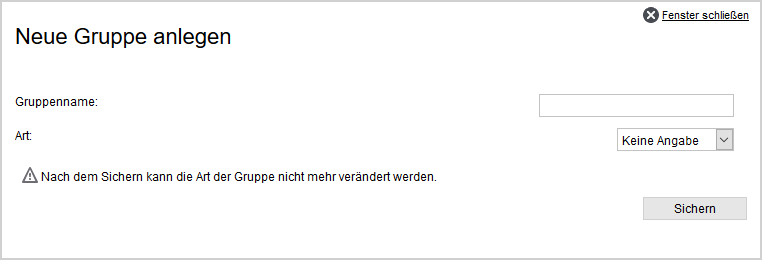
You can create another group or configure the newly created group by opening it for editing.
Using the list of groups, you can delete a group with the trashcan ![]() icon.
icon.
Edit office group
The group can be configured via the Edit ![]() icon. In case of an office group, all tabs are configurable.
icon. In case of an office group, all tabs are configurable.
The group settings are opened with the tab “Groups”. To make it easy to compare the settings of different groups, the selected tab is retained when the group is changed.
After selecting an existing office group via the edit icon ![]() , the tab “Groups” is opened, which displays the users that belong to this group.
, the tab “Groups” is opened, which displays the users that belong to this group.
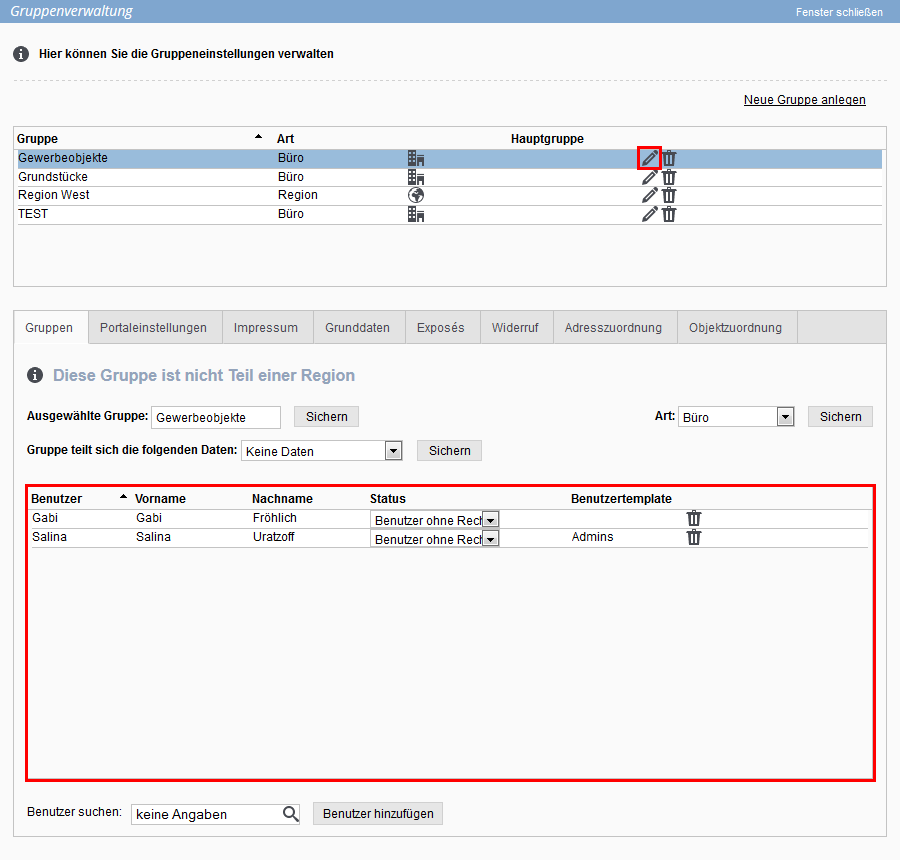
To add new users to a group, select and add the desired member at the bottom of the pull-down menu under “Search users”. If the desired user cannot be found, he is still a member of another office group.
Users can only be members of one office group, they must first be removed from the other group
Users can be removed from the group using the trashcan ![]() icon.
icon.
Alternatively, users can be assigned to / removed from a group via the user settings).
In the office group, 3 different statuses are available for group members.
- Line: A user with the status Lead can open and partially change the group settings) of his own group. He cannot add or remove users.
The group leader has the right to see not only his own tasks but also those assigned to another user in the group or only to the group.
For some reports, the group leader can also retrieve evaluations for groups.
If the“Timekeeping” add-on module is purchased, users with the “Management” permission can approve holidays.
If the“Success cockpit” add-on module has been purchased, the group leader can add the success cockpit widget for groups. The check mark in the Statistics column is set by default - Users: A simple user has the right to view not only his own tasks but also those assigned to another user in the group or only to the group.
- User without rights: A user without rights has no special group rights.
If the checkbox at Statistics is activated, the user can use the success cockpit for groups.
Via the Portal Settings tab you can view the portals that are already activated under Tools >> Settings >> Basic Settings >> Portals. For the groups, you can decide which portals should be used by the group members by clicking on the status. Furthermore, you can define different access information for the portals. Users who belong to the office group can then only place properties in this selection of portals.
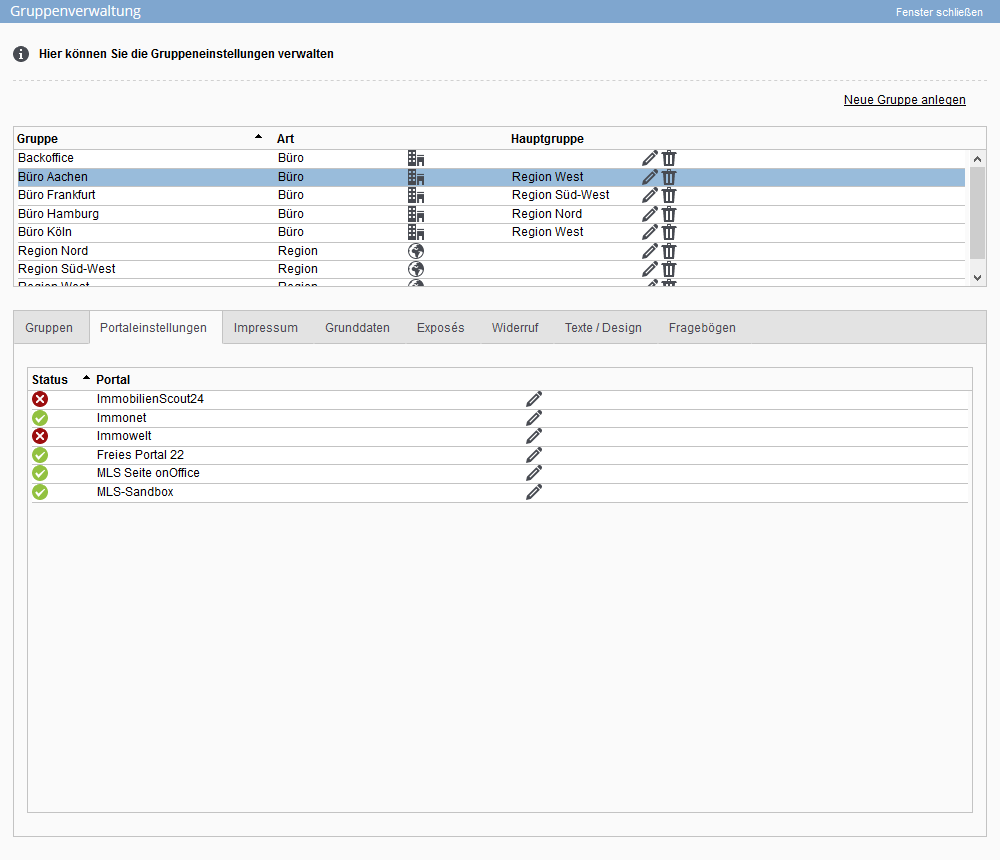
You can set other access data for the selected portal using the editing pen ![]() and store them for the group using the“Save” button. These data are only valid for the group and do not overwrite the basic settings.
and store them for the group using the“Save” button. These data are only valid for the group and do not overwrite the basic settings.
If no settings are specified, the settings from the portal basic settings apply. Already stored data can be removed in the lightbox by clicking the“Delete” button.
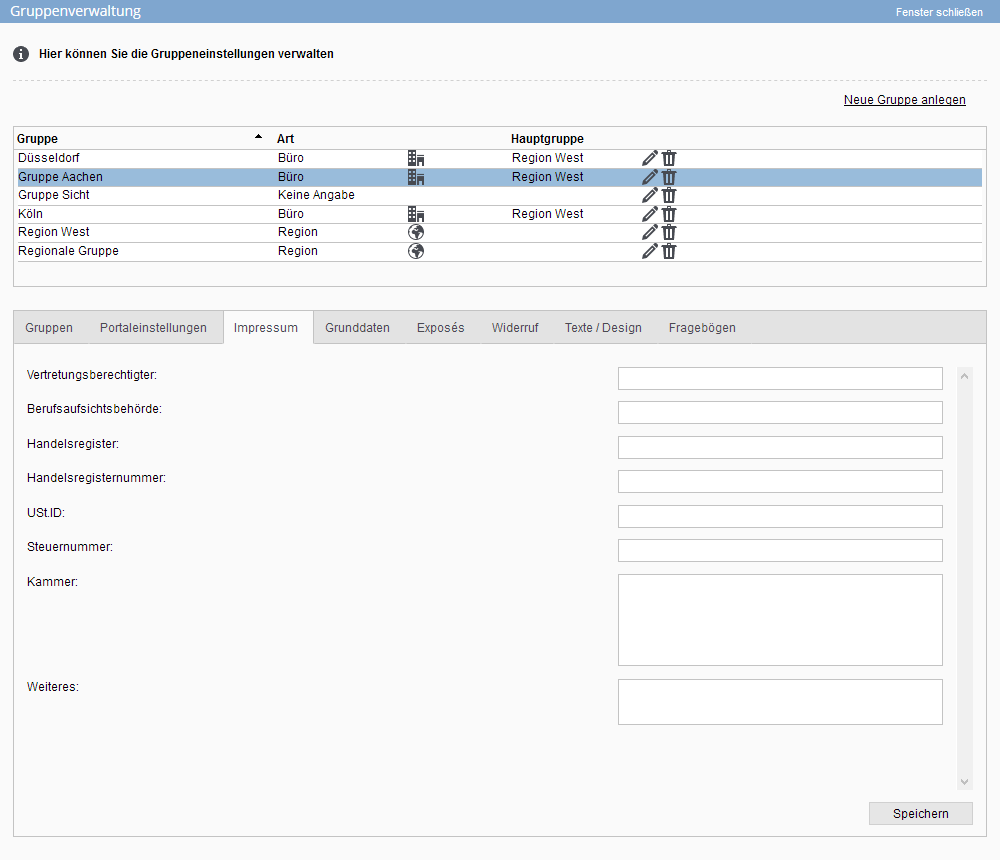
In the Imprint tab, you can store all the imprint data relevant for the group. The imprint data is intended e.g. for the imprinting of websites, PDF brochures and other relevant places. They can be output via certain macros. If you have not specified any data for your group, the imprint data from the basic settings will be used.
You can define specific settings for the group on the Basic Data tab. Please note that all group settings are above the basic settings.

In general, a section of the settings from the basic settings is shown here. Some of the settings are briefly explained here:
- Group prefix: Here you define a prefix of the branch office, which is taken into account when creating the external property number. You can also set the external start property number as a number.
- Group logo: As in the basic settings, you can store a separate logo for your group here.
- Watermark: Here you can define an individual group watermark. With the Force Watermark setting, every image uploaded to a property by a group member via the Image Uploader will be marked with this watermark. With the option no watermark the set watermark is never output.
- Data of the office: Here you can store the relevant data of your branch office. These are the address including geo-coordinates of the office, contact details of the office and account details of the office. These data can be called up via macros and, for example, can be incorporated into a free text.
- Appointment reminder: Here you can set the default email template that should be sent by email in case of an appointment reminder.
- Portal request: As in the basic settings, you can define data for direct responses to portal queries here. In total, you can store 3 different combinations of a mail template and an brochure each. As default for e.g. the onOffice app, the templates of the first combination apply.
- Alternate rider: With this setting, you can make it easier for you and your group members to work with addresses. For example, you can use the selector to specify that the “Relationships” tab is always opened when an address is opened.
- Window TV: The group-specific URL of the Shop-Window TV is displayed here.
- TERMS AND CONDITIONS: First, the data from the client’s basic data is used here. However, you can also upload a group-specific GTC file, which is then used instead of the GTC file from the basic data.
- Duty to inform: If nothing is stored here, the form from the basic data >> tab “GDRP” is used. You can also upload a group’s own PDF hint form, which will then be used.
- Search criteria template: Use this setting to specify which search criteria template is to be used as the default by the group members.
- Openimmo import filter: Here you can specify the provider numbers that are allowed for the group. Whether this option is displayed is determined in the basic settings.
- Legal notice: Here you enter a legal notice valid for the group. This can be output via a group macro.
- About us: Enter a short statement about your office group centrally. The content can be retrieved with a macro (_OfficeGroupUeberuns) and integrated into emails or PDF templates.
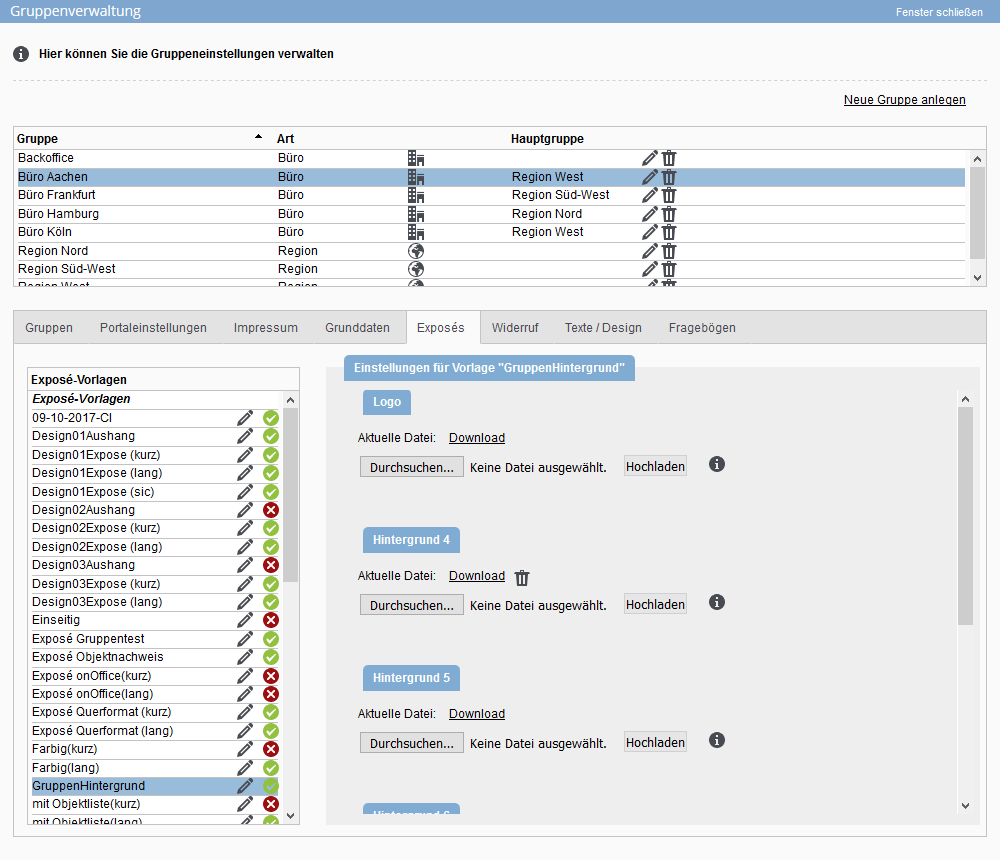
In contrast to the portal settings, all stored Brochure templates are displayed here. You can adjust the shares for the group differently from the basic settings.
In the PDF brochures from the PDFdesigner that are shared with your group, you can adjust the settings for the individual background images. This allows you to define separate backgrounds per brochure for each office group.
On the Revocation tab, the revocation from the basic settings is displayed the first time you open it. If you change the cancellation in the group, you can no longer access the cancellation from the basic settings. A detailed description of how to configure the revocation can be found here.

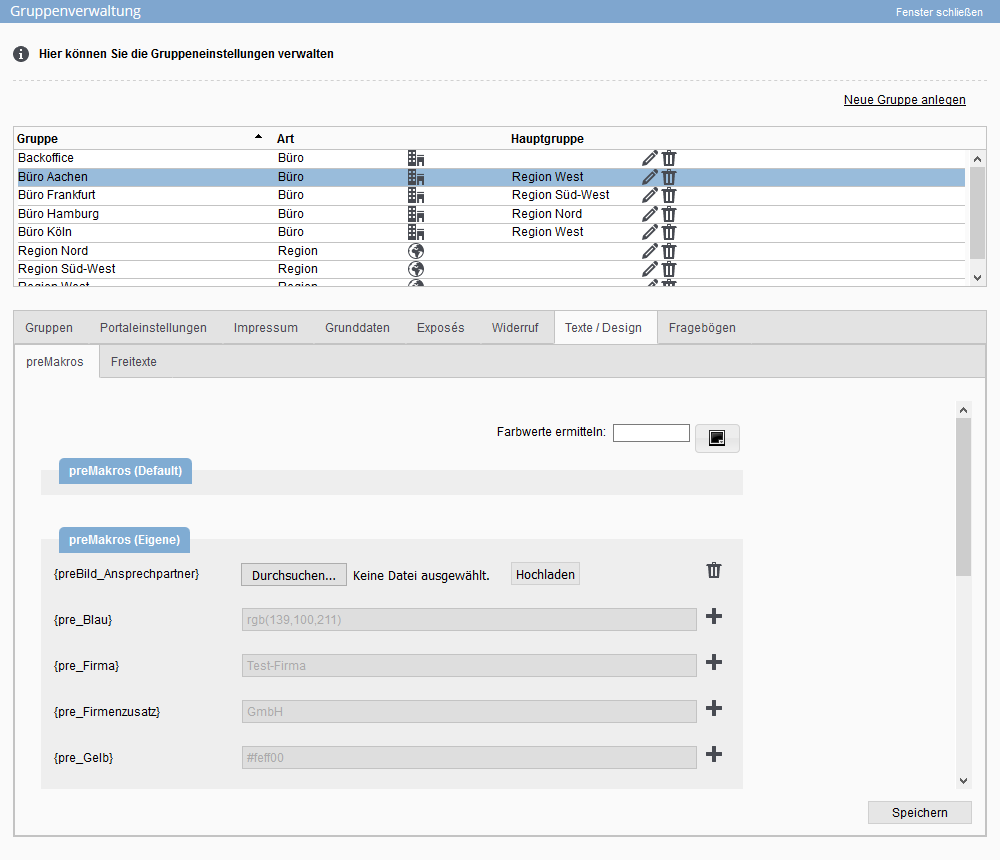
The tab Texts / Design has 2 subcategories:
- preMacros: preMacros are a special type of macro. They can output preset colors in signatures or be built into templates as permanent file attachments. All preMacros from the basic settings are displayed, but they can be changed specifically for the group. How to create and use preMacros in the basic settings can be read here.
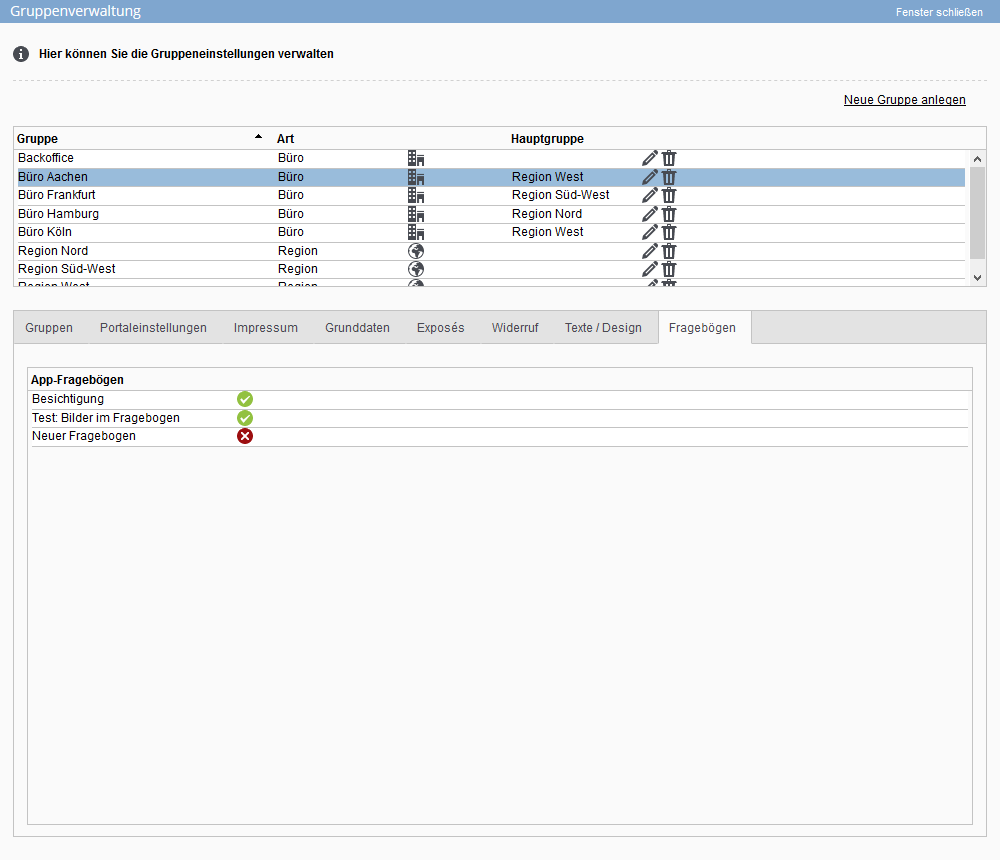
- Free texts: Under user-defined texts, you can store group-specific user-defined texts and images for templates. In contrast to the preMacros, no data from the basic settings is taken over here. You can read here how to create free texts and what you can store in them.
Here you can see the already created app questionnaires. You determine which App-questionnaires may be used by your group members. You can read about how to create questionnaires here.