You are here: Home / Tutorials / Step by step / Administrative instructions / Request manager - set up

Step by step
Request manager – set up
The request manager automatically processes portal requests for existing and active properties. If the request does not come from a known address (email address), an additional address can be created (with or without checking the data / duplicate check). Afterwards the request can be answered automatically.
This means that inquiries without property reference are NOT processed.
The work of the request manager can be roughly divided into 3 sections, whose configuration we will go through step by step in the example:
- Email inquiries
- Process addresses
- Process request.
In each of the steps, possible alternative configurations are briefly indicated and possible problems are also explained.
You can view and review the Request Manager via the widget on the dashboard, see step 5 for details.
After setup, all future requests will be processed automatically.
Please give the individual mailboxes and mail servers as well as the automatic system a little time, depending on the workload it can take a few minutes until the step(s) are processed. Please also note that the signature of the assigned user of the mailbox is always inserted.
Prerequisite:
For technical reasons it is necessary that the mailbox in which the requests arrive is located at onOffice. You can forward portal requests from another mailbox to this mailbox.
As stated at the beginning, the work of the inquiry manager can be roughly divided into 3 sections, with 2 questions per section, planning and configuration can be made easier.
The questions and the answers for our example are
- Email inquiries
- where do the requests come in?
-> mustermail@myonoffice.de - For which sources should the requests be processed?
-> Immoscout24, Immonet, own website
- where do the requests come in?
- Process addresses
- should the address data be checked / email address confirmed?
-> Obtain missing information for the duplicate check and check the reachability of the email address - Creating addresses, how?
-> Create new addresses, the real estate agent will be the property manager
- should the address data be checked / email address confirmed?
- Process inquiry
- should the requests be answered automatically, how?
-> automatic answer, with AgreementLink and Brochure - what to do with exceptions?
->Exceptions should be given as a task to the person in charge of the property
- should the requests be answered automatically, how?
With the answers the planning is already finished and we start with the configuration.
The section email requests is divided into “Where do the requests arrive” and “For which sources should the requests be processed? in the tab Automation in the basic settings.
Please remember, for technical reasons it is necessary that the mailbox in which the requests arrive is located at onOffice. You can forward portal requests from another mailbox to this mailbox.
The portal requests must arrive in a mailbox at onOffice, accordingly the configuration is done on the tab Email of the basic settings. Please open Tools >> Settings >> Basic Settings >> Email tab.
Inhaltsverzeichnis
- Configuration
- Alternative configuration
- It’s not working out as you wanted?
- Configuration
- Alternative configuration
- It’s not working out as you wanted?
- Configuration
- Alternative configuration
- It’s not working out as you wanted?
- Alternative configuration
- It’s not working out as you wanted?
- Alternative configuration
- It’s not working out as you wanted?
- Alternative configuration
- It’s not working out as you wanted?
Configuration
The email requests for property are sent to the mailbox “MusterMail@myonoffice.de” – or they are filed there by forwarding. Please note that only mailboxes that are located at onOffice can be used for the connection. If necessary, forwarding must be set up.
First of all, a “connection” between mailbox and request manager must be established.
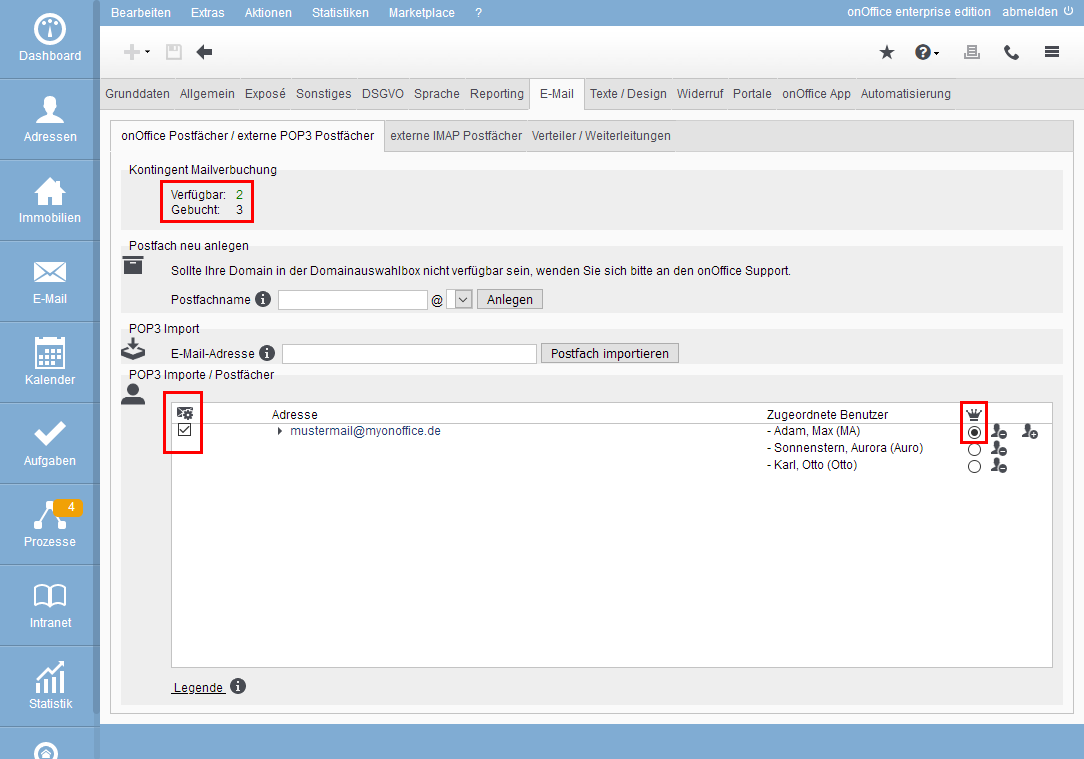
This is done in the basic settings on the tab Email by checking the box in the column ![]() “Automatic Email Update” at the mailbox “MusterMail@myonoffice.de” – Attention, a user must be assigned, otherwise no check mark can be set.
“Automatic Email Update” at the mailbox “MusterMail@myonoffice.de” – Attention, a user must be assigned, otherwise no check mark can be set.
In addition, the “First user” or “Main user” of the mailbox must be defined, this is done via the radio button at the crown column ![]() next to the assigned user (see picture above).
next to the assigned user (see picture above).
The “main user” is necessary, because for this user it is checked whether the requested property is available and active. The read rights of this user are respected. The user must have read permission for the property, otherwise the request manager will not take action.
The user must also have read permission for addresses if certain addresses are later to be excluded from automatic processing.
Alternative configuration
This is already the minimum configuration – you can do more, you can connect more mailboxes to the request manager, for example.
It’s not working out as you wanted?
You cannot select a checkbox at the ![]() Set “automatic email update”? Then please check
Set “automatic email update”? Then please check
– whether you have a number > 0 at the top of “contingent mail booking” under “available”. If not, please contact your sales contact person.
– The connection to the inquiry manager can only be established for internal mailboxes – i.e. mailboxes that are located at onOffice. You can set up forwarding from an external mailbox to an internal one.
The further configuration of the request manager is done in a separate tab, Tools >> Settings >> Basic Settings >> Automation tab >> Request Manager sub-tab.
In our example, requests from the portals Immobilienscout24.de and Immonet as well as from our own website are to be processed.
Configuration
For the configuration of the sources / portals there are categories in tab 2, “Active mailboxes” and “Active portals”, we start with “Active mailboxes”.
Active mailboxes
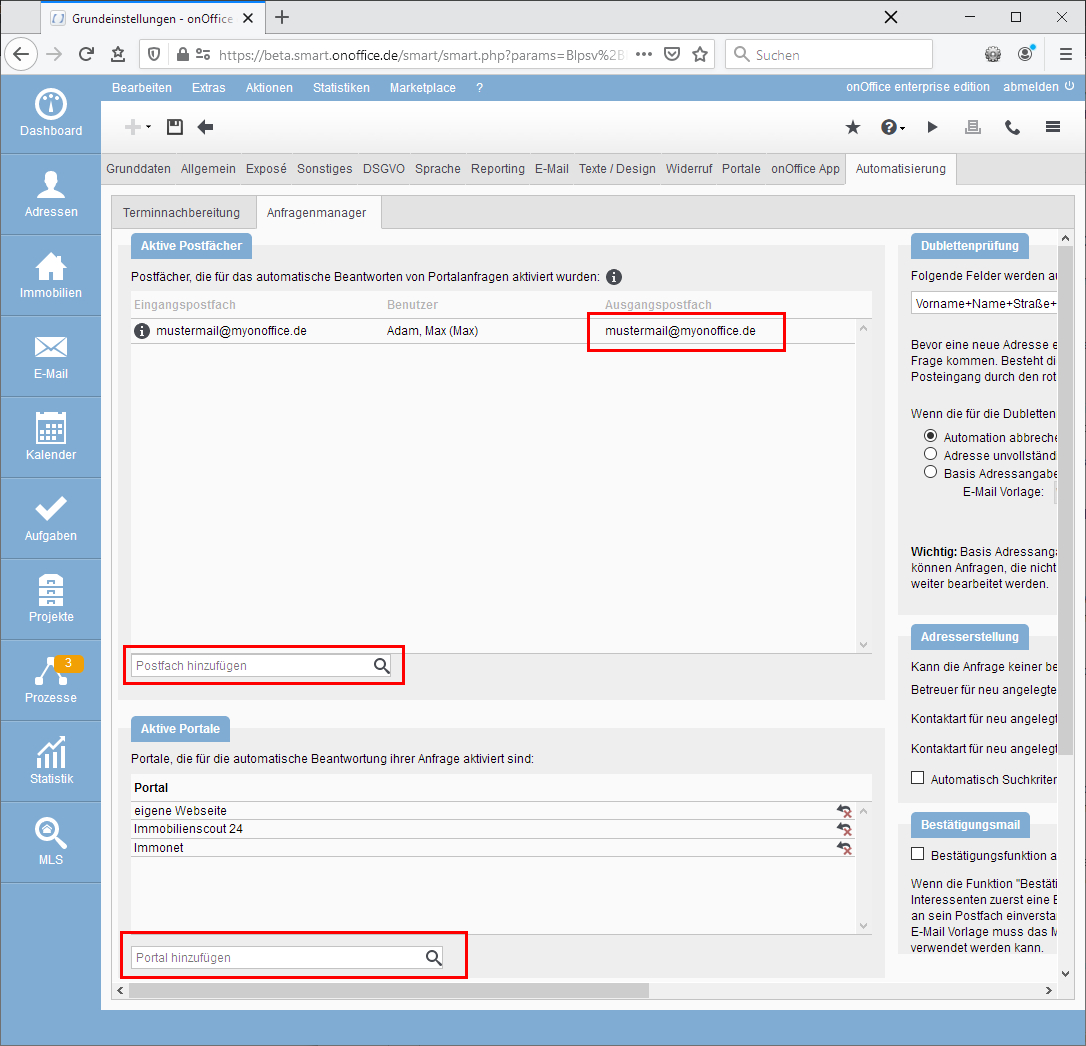
Below the list, we select the mailbox “MusterMail@myonoffice.de” in the “Add mailbox” dropdown. Of course, only those mailboxes appear here that have been checked in the email administration above at the column ![]() “Automatic email updating” and have not yet been added.
“Automatic email updating” and have not yet been added.
The mailbox is then displayed in the list and has as user the “main user” from the tab Email and the same mailbox “MusterMail@myonoffice.de” as outgoing mailbox.
In our case this main user and also the “MusterMail@myonoffice.de” should be used for the outgoing emails, so no further change is necessary.
Active portals
Now that the connection between mailbox and request manager on both sides is established, we specify the desired portals under “Active portals” to whose requests the request manager should respond. The portals for which there is a “portal filter” are available for selection (i.e. all those whose request mails have already been marked with an asterisk in your inbox).
In the example we choose here “Immobilienscout 24”, “Immonet” and “own website” – if your website is not from onOffice, you have to create a suitable portal filter. If you have any questions, please contact the onOffice support.
Alternative configuration
For the “Active mailboxes” we have set up the minimum configuration.
More would be e.g. to change the sender and thus the signature of the outgoing emails. For this purpose, the mailbox can be edited in the list via the wrench symbol ![]() entry and another user can be selected. This user MUST also be assigned to the inbox.
entry and another user can be selected. This user MUST also be assigned to the inbox.
More would also be, if another mailbox should be used for the outgoing emails, e.g. another one than the general request@… which was used for the requests. For this purpose, the mailbox can be edited in the list using the wrench symbol ![]() and another mailbox can be selected, all mailboxes where the selected user is assigned are possible.
and another mailbox can be selected, all mailboxes where the selected user is assigned are possible.
It’s not working out as you wanted?
The desired mailbox is not in the list? Then please check whether the checkbox in the Email tab in the column ![]() “Automatic Email Update” is ticked and whether at least one user is assigned.
“Automatic Email Update” is ticked and whether at least one user is assigned.
The portal does not appear in the list? Sounds trivial, but it could already be added. It is possible that the name of the portal is different than you expect because the name has changed or a colloquial name is used – IS 24 instead of ImmobilienScout24 or Immo Scout 24 or Immobilien Scout GmbH or the portal differs from country to country … .
You can also read the portal filter from the existing requests. If you click on “Show more information” at the top of the header of a portal request mail , the name of the portal filter is displayed at “Email filter:”.
Sometimes an orange triangle ![]() is displayed at one of the entries, click on the triangle to display the warning text and you can react accordingly.
is displayed at one of the entries, click on the triangle to display the warning text and you can react accordingly.
This concludes the section “Email inquiries”.
Don’t worry, if you accidentally open a mail in a mailbox for the request manager, the processing will not be interrupted.
After the incoming email has been checked for a suitable property and it comes from one of the selected portals, the address data from the inquiry is determined and checked.
To check whether the address is already known and/or whether exceptions apply to certain addresses, the main user from the inbox (see point 2.1) must have read access to the addresses.
If “Selected addresses” has been configured as an exception in the “Other configurations”, the system first checks whether the request comes from an “excluded address”. If so, the automatic processing is aborted.
If the request comes from an email address that is already stored with an address, then this part will be skipped completely and you will proceed to answer the request.
If the request comes from an address that is already inquired about, then no further request will be sent. Once the response to the request has been received, the waiting requests are answered gradually.
What is checked for unknown addresses and what should be done with them is done in Tools >> Settings >> Basic Settings >> Automation tab >> Request Manager sub-tab in the 3 categories, “Duplicate check”, “Address creation” and “Confirmation mail”.
In the example, the addresses are to be checked for duplicates and the email address confirmed.
Only one mail is sent at a time to check address data and availability of the email address, but in individual cases it may only be necessary to check the availability of the email address – or only one may be desired, so there are 2 separate configurations. Let’s look at these two using the example.
Configuration
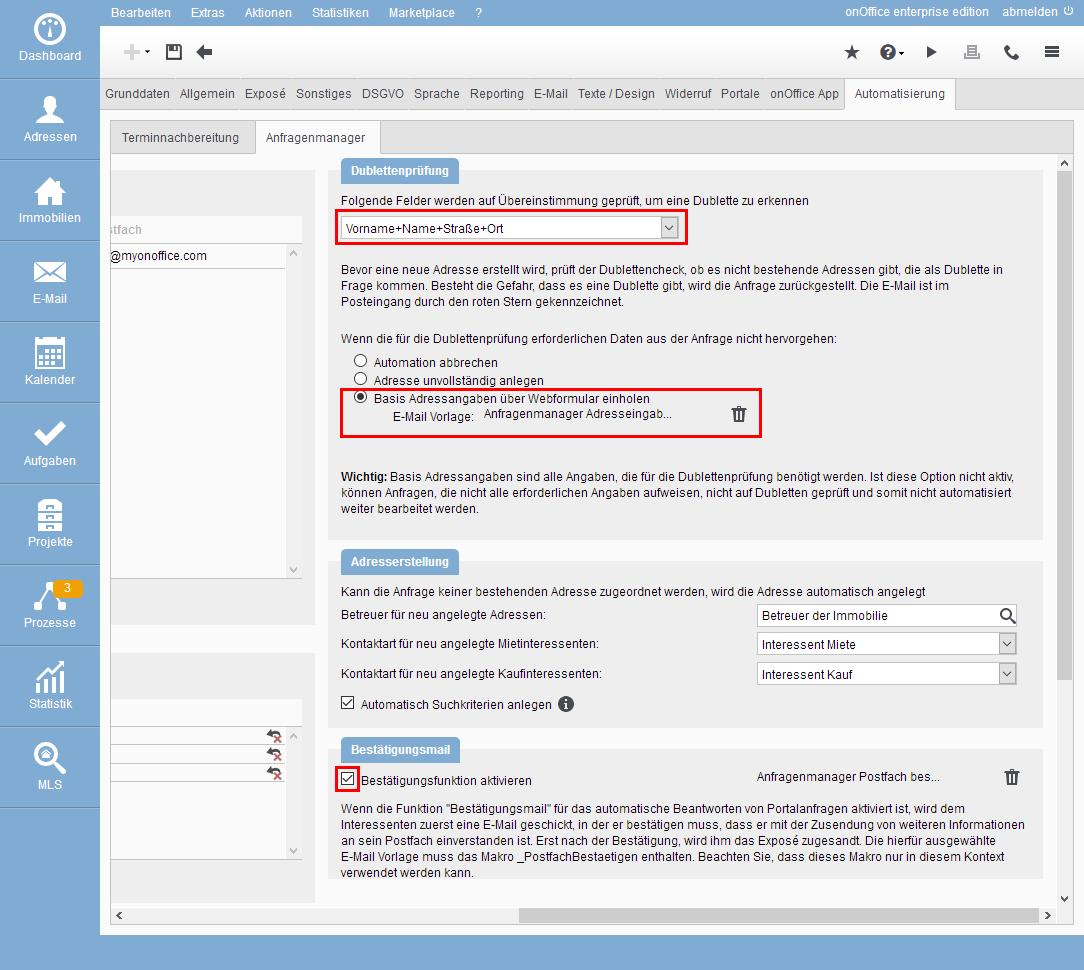
Let’s start by checking for duplicates when we create the address. This is done in the category “Duplicate check”. The duplicate check covers the complete address data records, it differs from the duplicate checkthat you can perform in onOffice enterprise edition.
For the check for duplicates, we select “First name+last name+street+place” in the example. If this information is not contained in the address data determined for the inquiry, we will indicate what is to be done in the next step: Cancel automation // Create address incomplete // Obtain basic address information via web form .
We would like to ask for the necessary address data and choose the 3. Possibility off. For this purpose, an email template is required, which is sent to request the additional data. In the example we use “Request Manager Address Entry Web Form” from the templates folder “oO-Templates with company color”. However, you can also create your own template. Please note that the template contains the macro “_AdresseingabeWebformular”.
No separate email is then sent for the email confirmation, but this is entered directly in the web form for address details.
What follows from the duplicate check?
If the duplicate check detects a duplicate, the automatic processing is terminated. If configured below, a task is also created. In the Request Manager widget from part 5, this is shown as the reason.
Then we look for the confirmation of the email address, under “Confirmation mail” – in the example the email address is to be confirmed.
In this case, an email is sent to the email address determined in the address data and asked whether the contact is really desired. This email will only be sent if no address details are requested.
Besides activating/deactivating the confirmation, the email template for the confirmation must be selected, in our example “Request Manager Confirm mailbox” from the template folder “oO-Templates with company color”. However, you can also create your own template. Please note that the template contains the macro “_PostfachBestaetigen”.
Alternative configuration
The selected configuration is the maximum variant at that point.
The minimum configuration would be to create the address incompletely and not to confirm an email address. Both could then be done via address completion – manually or via the process manager.
You can change which data is used for the duplicate check and switch off the confirmation of the email address.
The “Cancel automation” variant terminates the process and, depending on the configuration, leads to a task; everything else must then be decided by the person responsible for the task and performed manually.
It’s not working out as you wanted?
If you cannot save the configuration, please check again whether the templates also contain the necessary macros, “_AdresseingabeWebformular” for the address details and “_PostfachBestaetigen” for the email confirmation.
No address data is requested or the email confirmation is not sent? Please check whether the templates contain the required macros “_AdresseingabeWebformular” or “_PostfachBestaetigen” and whether no warning triangle is shown for “Active mailboxes”. Please check the text of the warning triangles by clicking on them, there might be a problem with the mailbox user or the outgoing mailbox.
After checking / confirming the email address in the previous part, a new interested party should be created as an address.
The category “Address Creation” contains the corresponding specifications.
In the example, we select “Property manager” as the address manager and leave the contact types at “Prospective tenant // prospective buyer”. We also activate the automatic search criteria .
Alternative configuration
There is a lot of choice in the drop downs, you have to choose the best combination for your process yourself. If you want the back office to check / further edit the created addresses, you can assign this user here.
If you want to start further steps via the process manager or work with the statistics module , you can set the contact types accordingly – you can create your own contact types if the existing ones do not fit.
The automatic search criteria should be set as in the settings in Basic Settings >> General .
Minimum configuration would be to specify “No selection” everywhere and to configure the address manually afterwards.
It’s not working out as you wanted?
If it should be the mailbox administrator, please check that no warning triangle is shown under “Active mailboxes”. Please check the text of the warning triangles by clicking on them.
If it should be the person in charge of the property, please check if the property manager is correct, maybe it has been changed in the meantime.
Digression: If under Tools >> Settings >> Basic Settings >> Miscellaneous >> Option “Create automatic agents log entry if the caretaker of an property/address is changed” is set, changes of the caretaker are noted in the agents log. Otherwise, you can search the record information of the property for caretaker changes, which requires experience with the record information.
The request was processed, the address checked and created or the request was assigned to an existing one. Either way, at this point we have an “inquiry email” about an existing, active property and an associated address record.
Now we can decide what to do with the inquiry – answer / not answer or if there is an exception how to report it.
All this is set under Tools >> Settings >> Basic Settings >> Automation tab >> Request Manager sub-tab in the “More configurations” category.
In our example we want to send a reply to the interested party, with an agreement link and brochure. The category “Further configurations” contains the corresponding settings.
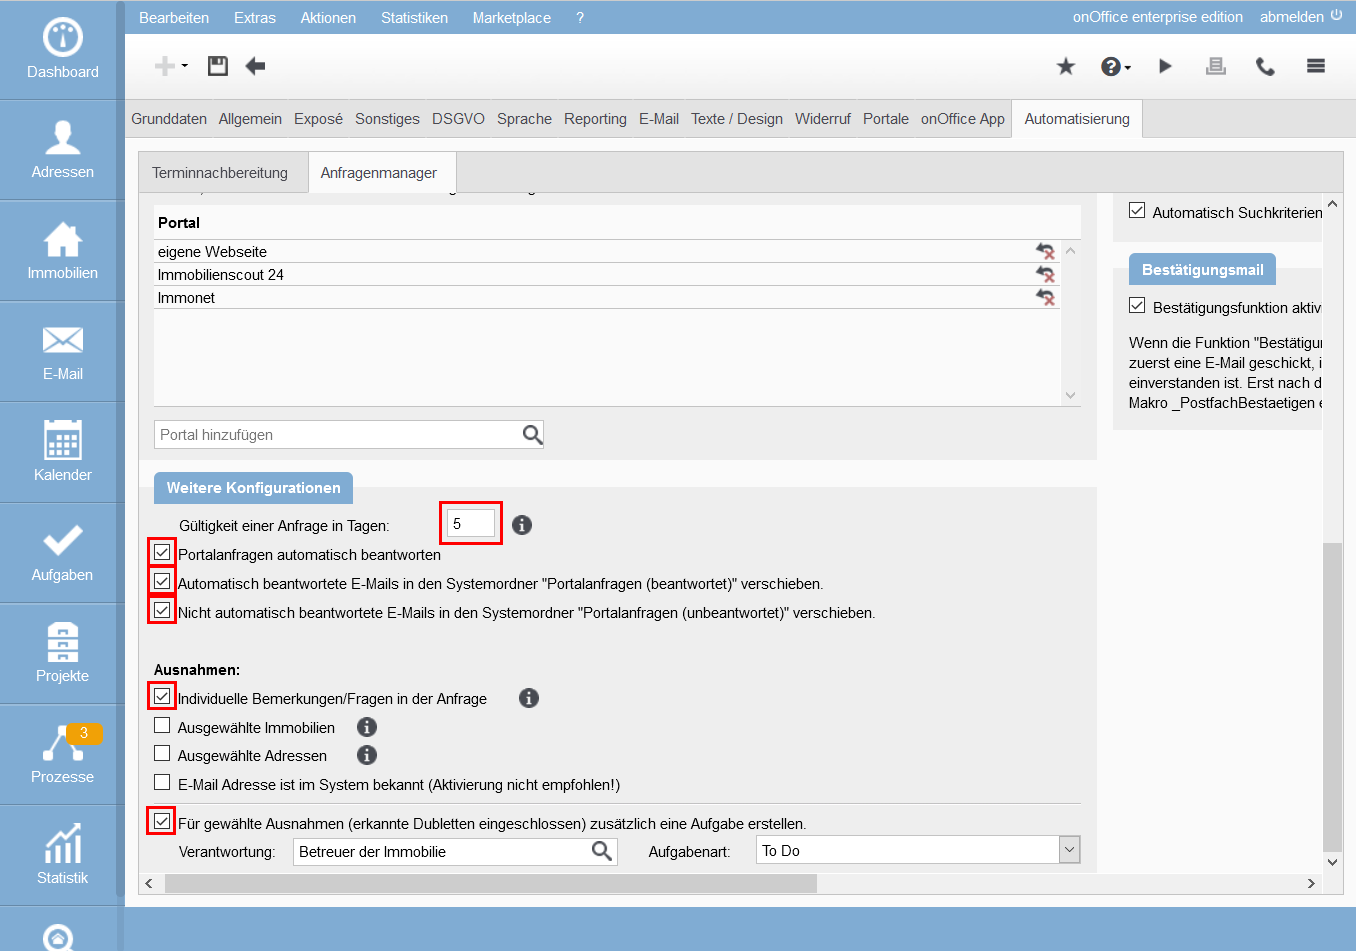
Since we ask for address details for the duplicate check or expect an answer from the interested party when confirming the email address, we determine the time within which this answer must be given so that we can classify the interested party as a serious interested party.
We take 5 days in the example, i.e. from sending the email for address data / email confirmation to filling out and sending the web form.
Possible further requests from this email address will be bundled and processed together within the validity period – so after the answer has arrived, the requests will be processed bit by bit.
To ensure that a reply is also sent, we place a checkmark at “Automatically answer portal queries”.
Now the question arises: What response will be sent? Is there only one fixed? Where can I configure you?
The answer is simple, in most cases you have already configured it. The emails / brochures are sent, which you use for the previous, manual“answer portal inquiries directly“.
Based on the requested property, the cases from Tools >> Settings >> Basic Settings >> General >> “Portal Requests are checked and the corresponding email templates / brochure pair are used.
In the example we still set the check mark at “Move automatically answered emails to the system folder “Portal requests (answered)” and “Portal requests (unanswered)””, then the inbox is always tidy.
Alternative configuration
No response is possible as a minimum configuration.
You can change the validity of the request, the minimum value is 3 days.
You can have the answered portal requests and the unanswered ones moved to their own sub folders or have only one of them moved or none at all, depending on your working method.
It’s not working out as you wanted?
If no answer is sent, it is possible that the answer of the interested party was not sent within the set time or the property does not fit any of the stored cases (from Basic Settings >> General >> Portal Requests) for the answer.
Please also check whether a warning triangle ![]() is shown under “Active mailboxes”. Please check the text of the warning triangles by clicking on them. There may be a problem with the user or the outgoing mailbox.
is shown under “Active mailboxes”. Please check the text of the warning triangles by clicking on them. There may be a problem with the user or the outgoing mailbox.
Another possibility is that the selected portal filter is not the desired one. You can read the portal filter from the existing portal requests. If you click “Show more information” at the top of the header of a portal request email , the name of the portal filter is displayed at “Email filter:”.
In rare cases, the folder “Portal Requests (Answered)” may be missing. Please contact the onOffice support.
The last part defines what should happen with exceptions. In the example, exceptions are to go as a task to the property manager.
Here is very important: An exception is not an error; it determines when automatic processing should be terminated. You can specify here whether a task should then be created for faster reaction.
In the example, we only check the box “Individual remarks/questions in the request so that we can respond to questions. In this process, only those inquiries are recorded for which the interested party has provided a question beyond the standard text of the portal.
An address duplicate is also activated as an exception, since we tick the creation of a task for exceptions. This cannot be separated.
Please remember that the duplicate check is carried out using the criteria in step 3.1 and differs from the duplicate checkthat you can carry out in onOffice enterprise edition.
As recipient of the task we define the caretaker of the property, as task type we take ToDo (you can define your own types and select them here).
Alternative configuration
If you don’t want any exceptions, you don’t have to check anything here.
Whether you need further actions instead of a direct answer for some properties (“Selected properties” (after activating this option, the option “Do not answer automatically” is added to the technical details of the property), you can configure according to your workflow.
To exclude only some addresses, such as brochure collectors, from automatic processing, you can use the “Selected addresses” option. Similar to the “Selected properties”, you can then activate a checkbox in the administration category “Administration” to specifically exclude addresses.
If you do not want to receive answers to all inquiries of known interests, you can activate the option “email address is known in the system (activation not recommended!)”.
Whether and who should receive the task in case of exceptions is also dependent on the workflow. The task type can be an individual one, which enables e.g. statistical evaluations or automatic processes with the process manager.
It’s not working out as you wanted?
The defined exceptions do not apply or do not lead to a task?
Please check again if the conditions for the exceptions are met and if you are allowed to see the created task for the corresponding user.
Please check whether the main user of the inbox (see point 2.1) has read access to the properties / addresses for which exceptions are to apply.
This completes the setup of the request manager and all future requests will be processed automatically.
Please send test requests from your website/portals and check the emails sent.
Please give the individual mailboxes and mail servers as well as the automatic system a little time, depending on the workload it can take a few minutes until the step(s) are processed.
Anything that’s automatic is nice, but when it doesn’t work… – so you should also check the work of the inquiry manager.
We can view the request manager in the specified mailbox(es) and via the request manager widget for the dashboard.
Please remember, after setting up and changing the request manager, send test requests from your website/portals and check the emails sent.
Let’s first look at the mailbox that is used for the requests. Do not worry, if you click on an unread mail in the mailbox for the requests, the automatic processing will not be interrupted.
Please remember, the request manager only processed requests that arrived after it was set up / last modified.
In the inbox you will find portal requests that are emails with an asterisk. Depending on the configuration, the emails are in the corresponding sub folders “Portal requests (answered)” or “Portal requests (unanswered)”.
Depending on the processing status, the color of the stars varies.
There are 2 cases where you should take a look at the email.
On the one hand for inquiries with a red star ![]() . Samples should be sufficient here if you have activated the creation of a task for exceptions in part 4. Then all aborted requests should also have a regulated path for further processing via the task.
. Samples should be sufficient here if you have activated the creation of a task for exceptions in part 4. Then all aborted requests should also have a regulated path for further processing via the task.
Otherwise, you should make a note of the date and time of the email and search for the request in the Request Manager widget, where you can find more details.
On the other hand for inquiries with a black star ![]() . Please check the date and time in your inbox first, if it is more than one hour ago, open the mail and check the portal or portal filter by clicking “Show more information” in the header above, and compare the name of the portal filter at “Email Filter:” with the name in the list of “Active Portal” (see part 2.2 ). Please also check whether the requested property is available, active and visible to the main user of the mailbox (see part 2.1).
. Please check the date and time in your inbox first, if it is more than one hour ago, open the mail and check the portal or portal filter by clicking “Show more information” in the header above, and compare the name of the portal filter at “Email Filter:” with the name in the list of “Active Portal” (see part 2.2 ). Please also check whether the requested property is available, active and visible to the main user of the mailbox (see part 2.1).
Here is a list of colors and status of portal requests in a mailbox for the request manager (the general variant for portal requests is available here)
 black stars show a portal request waiting to be processed
 orange stars indicate a portal request where the system waits for a confirmation or address information from the interested party.
 green stars show a portal request that has been processed and to which an address has been assigned.
 blue stars indicate a portal request that has been answered.
 red asterisks show a portal request whose processing was aborted.
Requests that the request manager processes can be displayed in a widget in the dashboard.
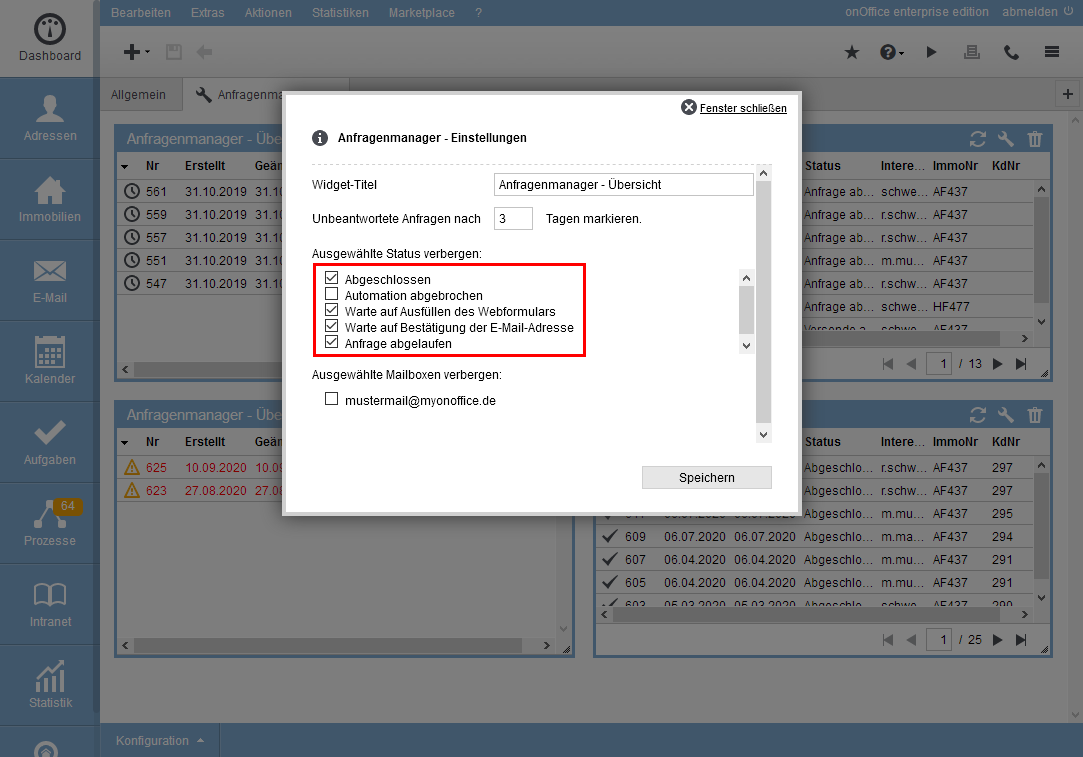
You can create a separate tab “Request Manager” in the dashboard and addthe widget there as usual, preferably 4 times, then you can use a separate widget for the different statuses of the requests.
You can configure the widgets via the wrench symbol ![]() in the widget frame.
in the widget frame.
In the first widget you can see the current requests in progress (please check “Hide selected statuses“, completed and automation canceled and request expired), in the second widget the expired requests (please check “Hide selected statuses“, all except request expired), in the third widget the canceled requests (please check “Hide selected statuses”, all except request canceled) and in the fourth widget the completed requests (please check “Hide selected statuses”, all except request canceled). the cancelled requests (please set all checkmarks at“Hide selected statuses” until request cancelled) and in the 4th the closed requests (please set all checkmarks at“Hide selected statuses” until request closed).
If you are assigned to all mailboxes defined for the request manager , you will also see all requests in the list – otherwise you will only see those to whose mailboxes you are assigned. This could be, for example, in the case of groups , those for your office group.
You can change the displayed mailboxes via the widget configuration.
In the online help for the Request Manager, you will find a description of the Request Manager widget and status, as well as information about the requests that can be viewed through the magnifying glass ![]() .
.
What to do if it doesn’t work? Here are a few first points of contact for control.
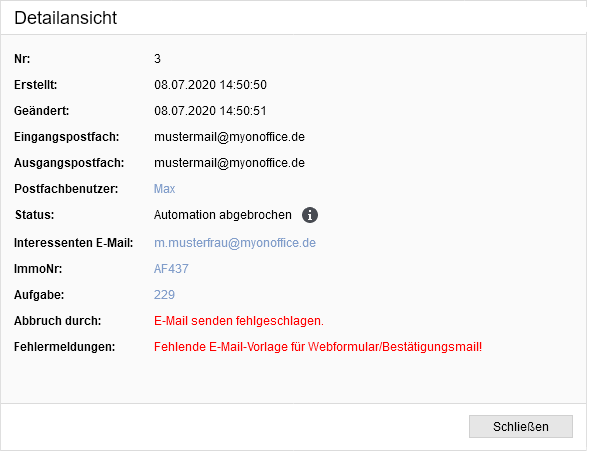
- Requests are aborted during processing
-> Please look in the request manager widget in the magnifying glass view for the details of the error message. Depending on which part of the configuration the termination belongs to, please look there under “It does not work as desired?
- Not so many requests / no requests are processed
-> First of all, please look into the mailbox that the request manager is supposed to process. Please check emails with a black star that are older than one hour. Please open the mail and check the portal or portal filter by clicking “Show more information” in the header above and compare the name of the portal filter at “Email Filter:” with the name in the list of “Active Portals” (see part 2.2 ). Please also check whether the requested property is available, active and visible to the main user of the mailbox (see part 2.1).
If everything looks correct, please check the next point. - Please open the configuration of the request manager(Tools >> Settings >> Basic settings >> Automation >> Request manager) and check if warning triangles
 are present. Especially with the “Active Mailboxes”.
Click on the warning triangle to display the corresponding note. Please rectify the cause.
Attention: Extra user rights are required to open the basic settings, please ask your administrator if necessary.
Creating the address is not always the end of the story. Before / parallel to the sending of an brochure further actions are possible. The process manager, which can be used to start certain processes automatically when creating an address, is suitable for this purpose.
E.g. lead manager, address completion and revocation, follow-up tasks, emails for information to property or address managers …
In these cases it may be necessary to adjust the address manager and the contact types.
For inquiries from known interested parties, you must start the address completion manually if the data is to be updated.
Furthermore, you can create statisticsthat show requests and responses to automated requests, or complete address details or how many responses were received for completion, etc.

 Introduction
 Dashboard
 Addresses
 Properties
 Email
Email Calender
 Tasks
Tasks Acquisition Cockpit
 Audit-proof mail archiving
 Automatic brochure distribution
 Billing
 Groups
 Intranet
 Marketing box
 Multi Property module
 Multilingual Module
 onOffice sync
 Presentation PDFs
 Process manager
 Project management
 Property value analyses
 Request manager
 Showcase TV
 Smart site 2.0
 Statistic Tab
 Statistics toolbox
 Success cockpit
 Time recording
 Address from clipboard
 Boilerplates
 Customer communication
 External Tools
 Favorite links
 Formulas and calculating
 Mass update
 onOffice-MLS
 Portals
 Property import
 Quick Access
 Settings
 Templates
 Step by step