You are here: Home / Extras / Settings / Basic settings / Automation

Settings
Automation
On the Automation tab in the basic settings, you can store individual settings for modules whose automatic execution simplifies the work, such as the inquiry manager or the appointment follow-up.
The Request Manager and the Automatic CSV Export is an additional module that is subject to charge. Please contact your sales contact person for further information.
A video on configuration and usage can be found here . Additionally, there is a video evaluating the property feedback you can view here.
On the Automation >> Immofeedback tab, texts as well as settings can be specified for the profiles of the automatic appointment follow-up .
The former appointment follow-up is now called Immofeedback and has been extensively expanded: Separate profiles can be created for each appointment type, with texts and settings tailored specifically to these appointment types.
The configuration of your previous appointment follow-up is still available as a default profile with profile number 1.
You can also gather feedback from your customers independently of appointments. Via the new macro _Immofeedback(Profil:x) you can also send an email without any appointment reference at all.
Hier finden Sie
Profiles
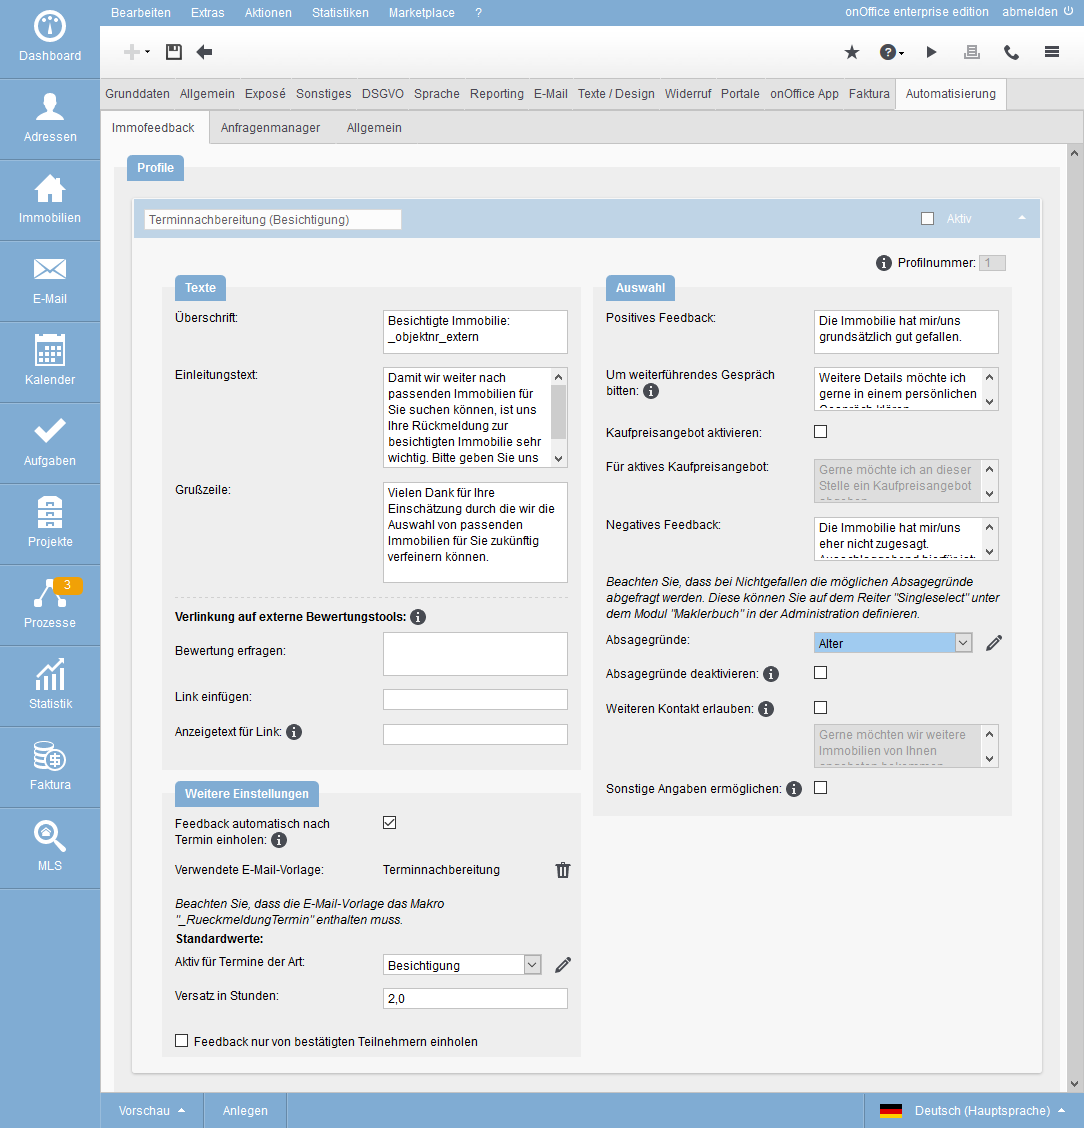
With the new Immofeedback you can create profiles for specific appointment types . Each appointment type can only be used in one profile. If the appointment type is already assigned in a profile, it will be grayed out in the selection popup.
There are already 2 standard profiles : “Appointment Follow-Up (Survey)” is tailored to provide feedback on a survey appointment. The “web brochure” profile can be used to obtain feedback on a sent web brochure . The default profiles cannot be deleted, but they can be customized or disabled.
At the top left you can give the profile a name. Use the “Active” checkbox at the top right to determine whether the profile is active. You can expand and collapse the profiles using the arrow at the top right.
Each profile has a number, which you can read in the upper right corner. Please use this number as a parameter in the new macro _Immofeedback(Profil:x) if you want to send an email without a deadline reference .
Multilingualism
Immofeedback is multilingual, i.e. the texts of the Immofeedback profiles can be stored in multiple languages. The prerequisite for this is the multi-language module.
The language selector at the bottom right displays the profiles in the selected language. The texts of the profiles can be entered in the appropriate language. The other settings of the profile are taken from the main language and are grayed out in the other languages.
Please note: The texts are not translated automatically, but you have to enter them in the corresponding languages.
Depending on the language of the contact to which you send the property feedback, the property feedback profile of this language will be sent.
Preview
Via Preview in the lower left corner you can preview the profiles you have created. After calling, a popup will open where you can select the property and address for which the preview should be generated. If you have created profiles in multiple languages, the language of the address determines in which language the preview is displayed.
Via Create you create a new profile.
For example, your profile might look like this:
Texts
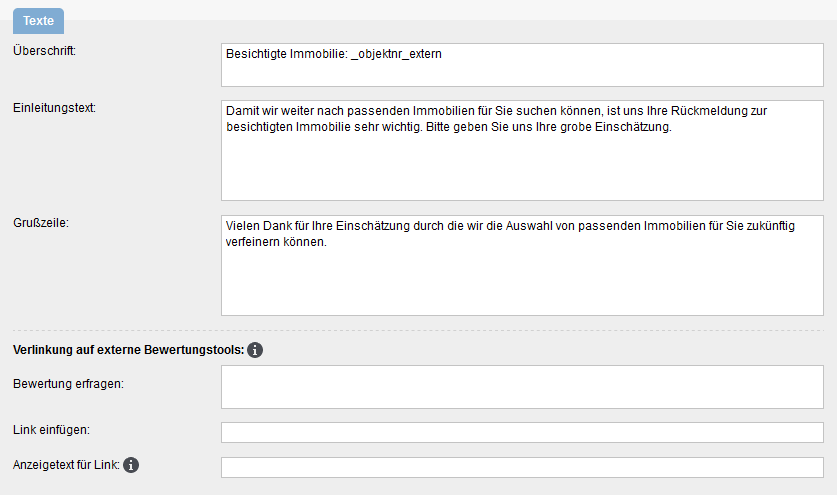
In the Texts category you define the texts that will be displayed to the customer in the property feedback form. Texts for the heading, introduction and greeting line can be specified.
By linking to external rating tools , links to external rating platforms such as “google.com” or “Facebook” can be inserted into the web view of the property feedback. Note that onOffice does not assume responsibility, or liability, for the content of linked sites.
At “Ask for rating” you enter an explanatory text or a question. At “Insert link” you enter the link to the external rating platform. Via “Display text for link” the URL entered at “Insert link” can be hidden in the web view for the property feedback. The entire content of this field is displayed as a link.
Macros in text fields: For property feedback, you can use macros for the specific address and property reference.
Further settings
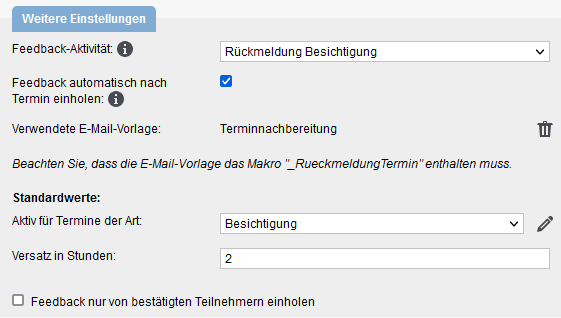
For Feedback Activity , you specify for the property feedback profile which kind of action the activity should receive when feedback occurs. In addition to the system values “Confirmation of viewing” and “Confirmation of web brochure”, you can also create your own values in the administration . The type of action is “Immofeedback / appointment follow-up”. The action feature additionally separates activity from positive and negative feedback.
The property feedback can be obtained with or without a date reference. At Get feedback automatically after appointment you set whether the property feedback should be sent automatically after an appointment for the set appointment types. Wenn Sie Feedback ohne Terminbezug einholen möchten, verwenden Sie bitte das Makro _Immofeedback(Profil:x). If you want to use feedback with appointment reference, activate this setting. Please note: If you disable the setting for a profile, email template, set appointment types and offset will be removed, as they are relevant only in automatic feedback after appointments.
Under Email template used , you can specify the email template that will be sent to the prospect. The template must contain the macro “_RueckmeldungTermin”, otherwise saving is not possible. Notice: If you have not yet created an email template, you can use the template ‘Follow-up of appointments’, which is made available to you by onOffice. You can find them in the template management in the email templates in the folder “oO – Templates with company color”.
Furthermore, in this category you can define for which appointment types the immofeedback will be activated automatically. You can also set a default for the offset – the time between the end of the deadline and the sending of the email – here.
Feedback only from confirmed participants allows you to limit the group of recipients to those who have confirmed the appointment .
Selection
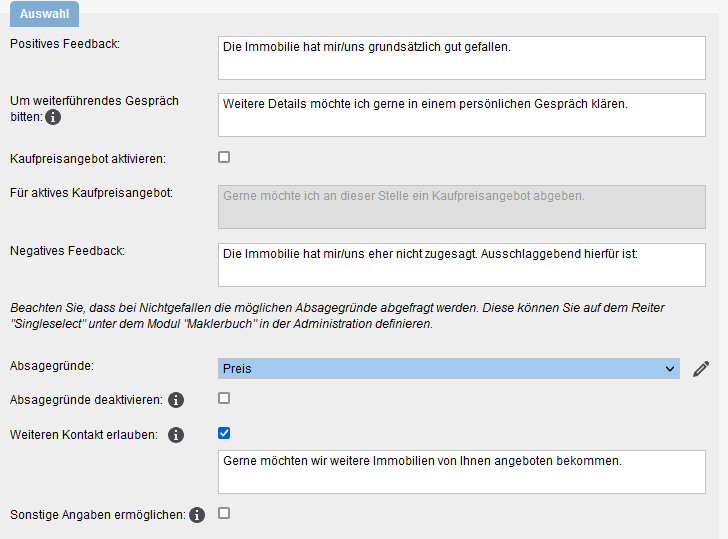
Using the “Selection” category, you can customize the feedback form with the appointment rating and set whether certain content should be displayed as well as the texts for it.
For “Positive Feedback”, enter the text to be displayed for the “Positive Feedback” checkbox.
The web form includes a checkbox where the prospect can ask for further discussion if necessary. The checkbox can be labeled individually via “Ask for further discussion”.
If “Activate purchase price offer” is active, then the interested party can submit a purchase price offer in the form if they like the property. This offer can also be configured on the tabs property Search at Addresses as well as Interested Parties at property as a separate column “Purchase Price Offer (Interested Party)” for the list. The most current purchase price offer is displayed.
Use “For active purchase price offer” to specify the text for submitting the purchase price offer.
For “Negative feedback”, enter the text for the checkbox if the customer did not like the property.
The interested party has the additional possibility to give a reason for refusal if he is not satisfied. This can be done in the administration under Tools >> Settings >> Administration >> Singleselect >> Module: agent’s log >> Key field: Reason for rejection must be maintained. The specified rejection reason can be displayed as a column on the “Properties >> Interested parties” tab via the list configuration.
Under “Reasons for cancellation” you select which reasons for cancellation are available for the customer to choose from. The possible reasons for rejection can be set separately for each profile. This allows you to present different reasons for selection when soliciting feedback, e.g. on an brochure, than for a viewing, for example.
The checkbox “Deactivate rejection reasons” prevents the query of rejection reasons in case of negative customer feedback or not liking a property.
If “Allow further contact” is checked, then an additional checkbox is displayed in the web view in the event of rejection / negative feedback, which the customer can use, for example, to express his interest in further property offers. You can then define the text for it in the text field below the checkbox. The documentation is done via the remark in the customer’s activities.
If “Allow other information” is active, the interested party is not forced to choose one of the selectable reasons for rejection. In a text field he can describe why he does not like the property. Note that these reasons cannot be evaluated statistically.
On the tab Automation >> Request Manager , settings can be specified for the request manager.
A detailed description is provided by the request manager himself, here is just a brief overview.
Active e-emailboxes / active portals
From the e-emailboxes that have been set up, you can select here which ones are to be automatically processed in the request manager. You can also define which portal requests the request manager should be responsible for.
Further configurations
Here you can define how long the request manager should wait for information and whether it should send an brochure after the address has been created.
In addition, you can specify when automatic processing is to be aborted and manual further processing is necessary.
Address setting
Here you can configure the duplicate check when creating addresses, specify details for the created address and whether the specified email address must be confirmed beforehand.
Answering portal queries
Here you can specify which email templates are available for direct response to a portal request . Optionally, PDF brochures can be specified, which will be attached to the individual emails. The pairs of filter,template and brochure can be set in the popup via “Open configuration”.
In doing so, the proposed template for the response can be customized using a properties filter. The templates – and the corresponding brochures – are checked in the order of the levels. The first filter that contains the property in the result gives the template.
Please note that a change to the pairs also affects the basic settings General, as the pairs can also be set there.

With the automatic CSV export you can export data from – addresses / activities / property / agent’s log and other areas – to an FTP server.
A detailed description is provided with the automatic CSV export itself.
Here you can find the setting for various features that are automatically executed in the background. These can be executed regularly at a certain point in time, or after the expiration of a time limit or at a certain event.
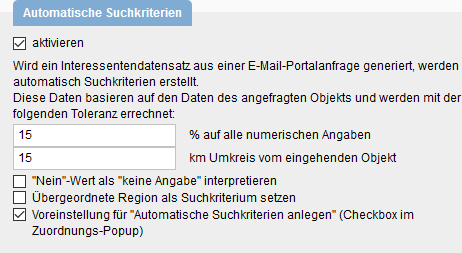
Automatic search criteria
If an email, a task, a agent’s log entry or an activity is assigned to an address and a property, a search criterion is created in the address data record. The corresponding checkbox for the search criteria is also displayed in the property search under the tab “Manual assignment”. The values of the search criterion correspond to the data of the assigned property, for numerical values a range of +/- 15% is entered. The figures are rounded up or down. Particularly in the case of area specifications, the “10” values are always rounded. In the search criterion, a radius search around the assigned property with a radius of 15 km is entered. You can adapt these values to your requirements.
Interpret “No” value as “No specification”” If there are fields with the value “No” in the property, “No specification” is entered in the search criteria for this, example field “Basement”.
“Set parent region as search criterion” If the regional suffix is used, this option allows the parent region to be set as the location for the search. So if a district is specified as the location for the property, the city is entered here in the search criterion.
“Create automatic search criteria (checkbox in assignment popup)”. This determines whether the Create Search Criteria checkbox is checked when assigning/creating a contact record from an email. Notice: If the checkbox is set, a search criterion is generated for each incoming email with address and property link.
The search criteria that are created from the CSV import, from web pages created by onOffice or if the checkbox “Create automatic search criteria” is present in the assignment popup and has been activated are considered “automatic”.
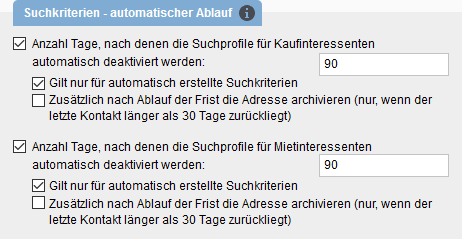
Search criteria – automatic process
It can often be assumed that an interested party is only of interest for a certain time. Especially in the area of letting, it can be assumed that the interested party is no longer actively searching after a certain period of time has elapsed. You should therefore set an expiry date. After this period, a search criterion is automatically deactivated and the interested party is no longer considered as actively searching in the system.
The settings can be used to determine how long different search criteria are valid. A distinction is made here between prospective buyers and prospective tenants. You can specify an expiration time in days and whether an address is archived after the expiration time.
Notice: The setting is effective only for newly created search criteria, not when editing existing search criteria. The “Valid until” date is set after saving the search criterion according to the set number of days.
Address completion
Via the address completion you can ask a contact to check and if necessary update his data. In the case of an interested party, you can also do this for the search profile. See the address completionpage for more information.
Which and how many search profiles are shown to the prospective customer can be set up here.
- Send all search profiles (max. 5 pieces)
- Send only the first search profile
If you have selected “Send all search criteria”, a maximum of five search criteria will be sent. Manually created search criteria are displayed first and then – if activated and available – the automatically created ones. The “most recent” ones are always in front.
With the option “Send only manually created search profiles” you can specify whether automatically created search criteria are also excluded. Automatic search criteria are created, for example, when you create an address in a portal query and the corresponding option is set in the dialog.
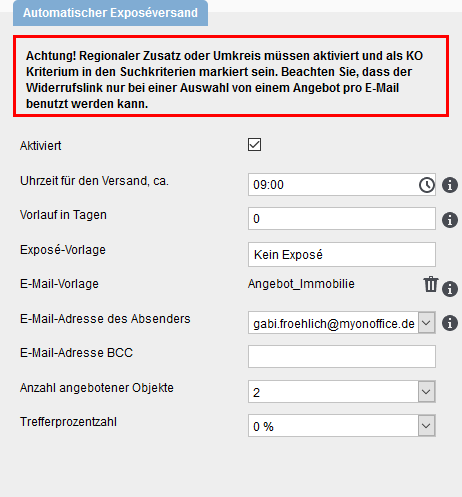
Automatic brochure dispatch
Here you can set how the automatic brochure dispatch should look like. You can determine when the dispatch takes place or from which email address the dispatch should be sent. The individual settings are explained in more detail here under Requirements / Configuration.
Please note: only active properties are taken into account for the automatic brochure dispatch. No brochures will be sent for inactive or archived properties.

 Introduction
 Dashboard
 Addresses
 Properties
 Email
Email Calender
 Tasks
Tasks Statistic-Kit
 Statistic-Tab
 Request manager
 Showcase TV
 Acquisition Cockpit
 Marketing box
 Success cockpit
 Process manager
 Groups
 onOffice sync
 Presentation PDFs
 Billing
 Smart site 2.0
 Project management
 Time recording
 Property value analyses
 Multi-Language-Module
 Automatic brochure distribution
 Multi-Object modul
 Intranet
 Audit-proof mail archiving
 Favorite links
 Boilerplates
 Property import
 onOffice-MLS
 Portals
 Address from clipboard
 Mass update
 Formulas and calculating
 Quick Access
 Templates
 Settings
 Customer communication
 External Tools
 Step by step
