You are here: Home / Additional modules / Process manager / Create process template / steps
€

Process manager
Create process template / steps
Via the menu Edit >> Process Manager >> Tab: Process Template you can see the list of existing process templates including the sample templates provided by onOffice. With the user right Design processes you can create new process templates. A new process can be created in the process management via the “Create new data record” icon .
Some process steps such as email, decision, SMS, etc. can be executed automatically if certain specifications are met. If these prerequisites are not met or another problem occurs, these automated process steps are converted to manual ones and displayed in the list of running processes with a warning icon plus a note. They also appear in the process owner’s list of processes.
You can find a video on this topic here and a video on how to create a sample process here.
Inhaltsverzeichnis
Process Designer Overview
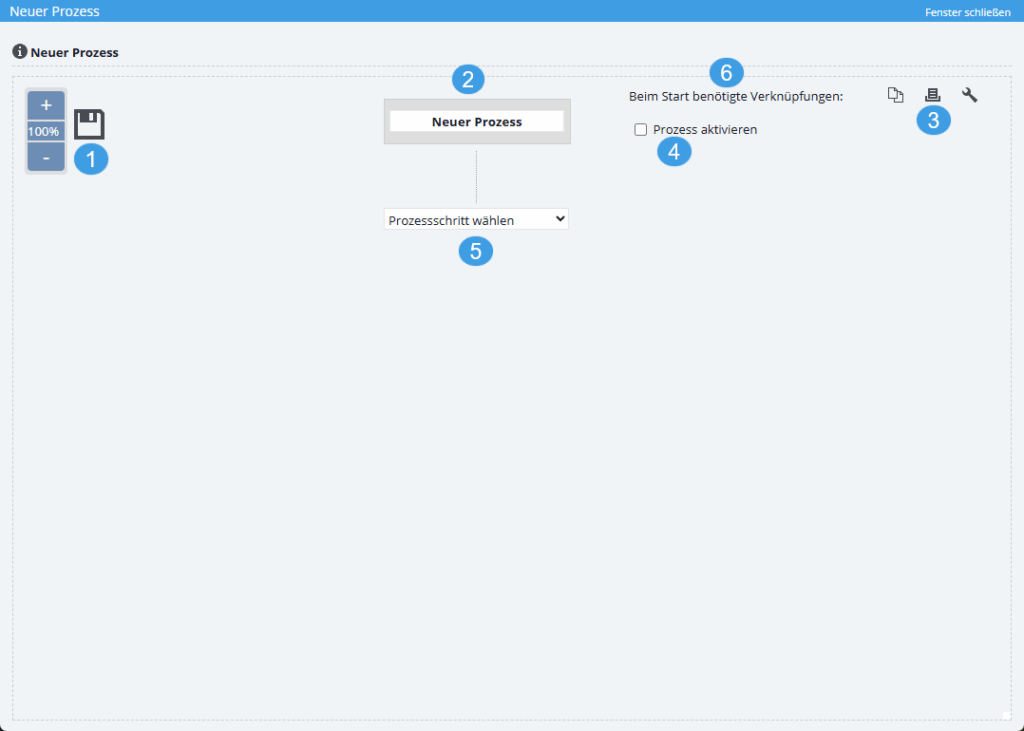
You have the following options in the open template mask:
- Item 1: Use the zoom to reduce or enlarge the view. This is useful if you have created a template that is very large and you want to view the whole process at a glance without scrolling.
- Item 2: Here you give your process a name. For example, “Owner Acquisition.”
- Item 3:
- Use the copy icon to copy an existing process template. The new template will be set to inactive (see point 4).
- Use the printer icon
 to print out the sequence diagram. The preparation of the print image depends on the browser used.
 - Use the wrench
 to enter the data:
- As the title of the process is.
- Who is authorized to start this process – groups and users can be selected.
- A description for the process – this is displayed when the respective process is started, as well as in the list views of the processes.
- A user as process controller – if no user is selected, the person who starts the process is used as the process controller. The process controller receives information by email as soon as a process step is skipped or the process is terminated. Whether an email is sent at the end is configured in the “End of process” process step.
- Item 4: New process templates are not automatically activated. When you are done defining the process, you need to activate the process manually. Only active processes can be started.
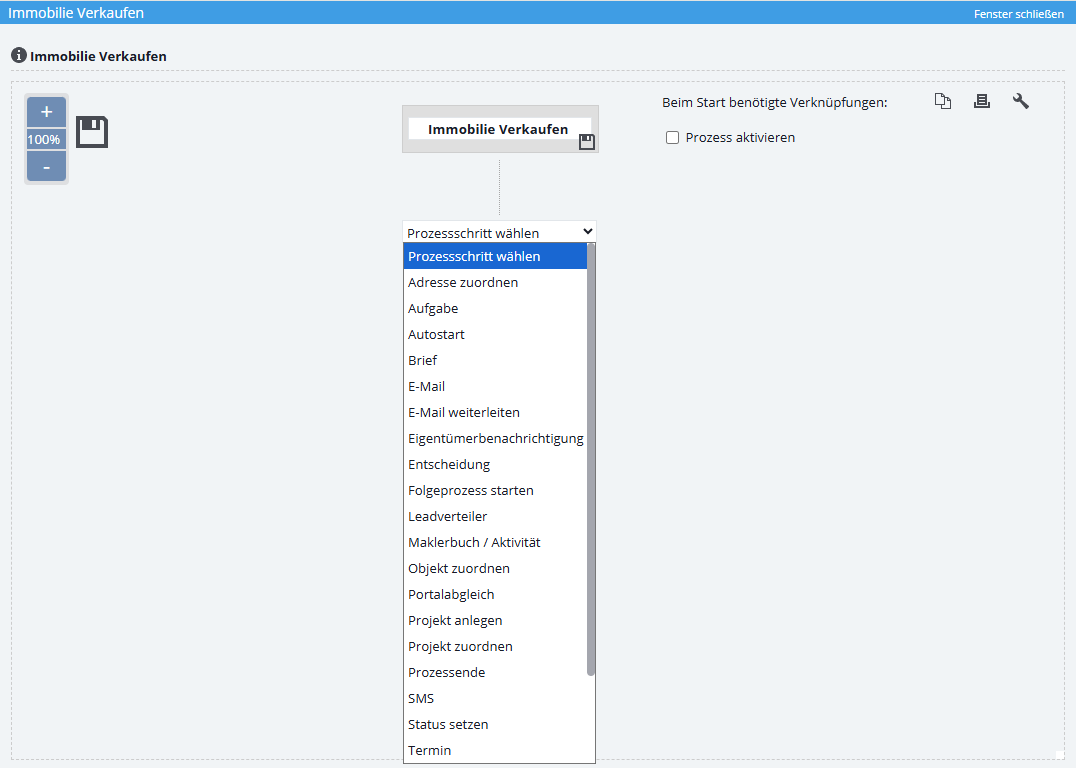
- Item 5: Via the item “Select process step” you define an action for the respective process step. Here you have the choice between the proposed actions.
- Item 6: Some processes require an address reference, others a properties reference, and some both. Via “Status of required links” you can see whether and from which step an address and/or properties reference is required. If address and/or properties is not specified, no reference is necessary for this process.
The basic elements of the Process Designer
There are several basic elements of process steps that are represented with different shapes in the Process Designer.
| Rectangular “Tasks, appointments, email, etc.” are displayed. To distinguish them, each type of action has its own color. |  |
| The decision appears as a diamond. |  |
| The merging of a branch and the end of the process are represented as an inverted triangle. |
|
- Manage processes
- Cancel / skip process
- Change process owner
- Execute process step
- Start process
- Create process template / steps
- Action Webhook
- Portal adjustment action
- Action Task
- Action Assign project
- Action Owner Notification
- Automatic process steps
- Action appointment
- Action Decision / Merge
- Action Autostart
- Action letter
- Action Forward email
- Action email
- Action SMS
- Action resubmission
- Action Set status
- Action Write values
- Actions Assign contact / property
- Action Create agent’s log / activity
- Action Start follow-up process
- Action process end
- Action Create project
- Lead distributor campaign

 Entry
Entry Dashboard
 Contacts
 Properties
 Email
Email Calendar
 Tasks
Tasks Acquisition Cockpit
 Audit-proof mail archiving
 Automatic brochure dispatch
 Billing
 Groups
 Intranet
 Marketing Box
 Multi Property module
 Multilingual Module
 onOffice sync
 Presentation PDFs
 Process manager
 Project Management
 Property value analyses
 Enquiry Manager
 Showcase TV
 Smart site 2.0
 Statistic Tab
 Statistics toolbox
 Success Cockpit
 Time Tracking
 Address from clipboard
 Text block
 Customer communication
 External Tools
 Favorite links
 Calculating with formulas
 Mass update
 onOffice-MLS
 Portals
 Property import
 Quick Access
 Settings
 Templates
 Step by step


